Please Note: This article is written for users of the following Microsoft Excel versions: 97, 2000, 2002, and 2003. If you are using a later version (Excel 2007 or later), this tip may not work for you. For a version of this tip written specifically for later versions of Excel, click here: Taking a Picture.
Excel provides a nifty little tool that allows you to create a picture from a range of cells, from a chart, or from another object in your worksheet. Follow these steps:
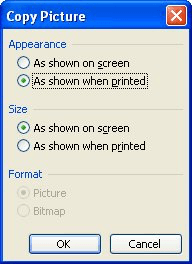
Figure 1. The Copy Picture dialog box.
The result is that you now have a graphic in the Clipboard—either a metapicture or a bitmap, depending on your choice in the bottom portion of the dialog box—that you can paste anywhere. Paste it in another workbook, paste it in an e-mail, or paste it in a Word document. You can paste it just about anywhere because it is no longer an Excel object, but an actual graphic.
You should know that if you choose "As Shown On Screen" in the Copy Picture dialog box, that doesn't mean that Excel copies the picture exactly as shown. The copied picture will always be at a 100% zoom magnification, regardless of what zoom setting you are using. Thus, if you are viewing your worksheet at 125% zoom, take a picture of some cells, and then paste the picture back into the workbook, it will look smaller than the rest of your workbook does because of how the picture is captured.
ExcelTips is your source for cost-effective Microsoft Excel training. This tip (3523) applies to Microsoft Excel 97, 2000, 2002, and 2003. You can find a version of this tip for the ribbon interface of Excel (Excel 2007 and later) here: Taking a Picture.

Professional Development Guidance! Four world-class developers offer start-to-finish guidance for building powerful, robust, and secure applications with Excel. The authors show how to consistently make the right design decisions and make the most of Excel's powerful features. Check out Professional Excel Development today!
The scroll bars can be very handy in navigating your worksheet, but did you know you can turn them off or on at will? ...
Discover MoreWant to add some spice to the graphics in your worksheets? There are many colors and effects in Excel that allow you take ...
Discover MoreDo you need to add a logo or other graphic to a bunch of worksheets? Here are a couple of short macros that can make ...
Discover MoreFREE SERVICE: Get tips like this every week in ExcelTips, a free productivity newsletter. Enter your address and click "Subscribe."
There are currently no comments for this tip. (Be the first to leave your comment—just use the simple form above!)
Got a version of Excel that uses the menu interface (Excel 97, Excel 2000, Excel 2002, or Excel 2003)? This site is for you! If you use a later version of Excel, visit our ExcelTips site focusing on the ribbon interface.
FREE SERVICE: Get tips like this every week in ExcelTips, a free productivity newsletter. Enter your address and click "Subscribe."
Copyright © 2026 Sharon Parq Associates, Inc.
 Please Note:
This article is written for users of the following Microsoft Excel versions: 97, 2000, 2002, and 2003. If you are using a later version (Excel 2007 or later), this tip may not work for you. For a version of this tip written specifically for later versions of Excel, click here:
Please Note:
This article is written for users of the following Microsoft Excel versions: 97, 2000, 2002, and 2003. If you are using a later version (Excel 2007 or later), this tip may not work for you. For a version of this tip written specifically for later versions of Excel, click here:
Comments