Written by Allen Wyatt (last updated August 5, 2021)
This tip applies to Excel 97, 2000, 2002, and 2003
To define a report, select the Report Manager option from the View menu. When you do, you will see the Report Manager dialog box. If there are any reports defined, they will be listed at the left side of the dialog box.
To create a report you should click on the Add button. You will then see the Add Report dialog box. (See Figure 1.) Using this dialog box you can control what you want the report to contain. In the field at the top of the dialog box you specify the name you want used for this report (spaces are permissible).
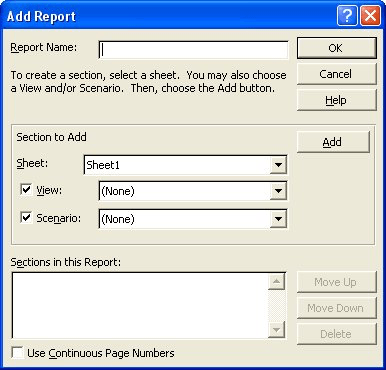
Figure 1. The Add Report dialog box.
The center portion of the dialog box allows you to specify what belongs in a section. Each section is technically nothing more than a worksheet in the current workbook, although you can also define views and scenarios you want to use.
In the Sheet field you can specify which worksheet you want printed for this section of the report. The worksheet originally shown is the one you were working on when you started the Report Manager. You can select different worksheets, however, by using the pull-down list at the right side of the field. From the resulting pull-down list, select the worksheet you want printed.
If you select the View check box, you can specify which view you want used when the section is printed. The default here is (None), but again you can use the pull-down list at the right side of the View field to expose a list of available views.
The Scenario check box, if enabled, allows you to specify which set of data should be used when this section is printed. As with the View field, the default here is (None). Clicking on the pull-down list at the right side of the field results in a list of scenarios being displayed.
Once you have selected a worksheet, view, or scenario, you can add the section. This is done simply by clicking on the Add button. The section specification then appears in the list of sections at the bottom of the Add Report dialog box.
When you are through defining your report, simply click your mouse on the OK button and the report will be saved.
ExcelTips is your source for cost-effective Microsoft Excel training. This tip (2903) applies to Microsoft Excel 97, 2000, 2002, and 2003.

Excel Smarts for Beginners! Featuring the friendly and trusted For Dummies style, this popular guide shows beginners how to get up and running with Excel while also helping more experienced users get comfortable with the newest features. Check out Excel 2019 For Dummies today!
The Report Manager allows you to create specialized reports that can be easily printed from your worksheet data. This tip ...
Discover MoreThe Report Manager allows you to create specialized reports that can be easily printed from your worksheet data. This tip ...
Discover MoreFREE SERVICE: Get tips like this every week in ExcelTips, a free productivity newsletter. Enter your address and click "Subscribe."
2018-11-12 08:46:06
Louise Young
This add-in is not available in Excel 2016.
Got a version of Excel that uses the menu interface (Excel 97, Excel 2000, Excel 2002, or Excel 2003)? This site is for you! If you use a later version of Excel, visit our ExcelTips site focusing on the ribbon interface.
FREE SERVICE: Get tips like this every week in ExcelTips, a free productivity newsletter. Enter your address and click "Subscribe."
Copyright © 2025 Sharon Parq Associates, Inc.
Comments