Please Note: This article is written for users of the following Microsoft Excel versions: 97, 2000, 2002, and 2003. If you are using a later version (Excel 2007 or later), this tip may not work for you. For a version of this tip written specifically for later versions of Excel, click here: Forcing a Worksheet to be Protected Again.
Barry can lock a worksheet so that only those to whom he gives the password can edit it. If the person enters the password, makes edits, and then saves the workbook containing the worksheet, that worksheet is then unprotected. Barry wonders if there is a way that, when saving the worksheet, Excel can remind the user to once again protect the worksheet using the same password originally used.
There are several ways you can go about solving this problem. If you've assigned a password to a worksheet, then you simply need to make sure that the same password is used to re-protect the worksheet when the workbook is saved. This is easily done by using a macro that can be tied to the BeforeSave event. This macro should be added to the ThisWorkbook object:
Private Sub Workbook_BeforeSave(ByVal SaveAsUI As Boolean, Cancel As Boolean)
    Sheets("ABC").Protect ("XYZ")
End Sub
This example assumes that the worksheet you want to protect is named ABC and that the password used to protect the worksheet is XYZ. You'll want to change these values to reflect your actual worksheet and password.
Note that this macro automatically re-protects the worksheet whenever the workbook is saved. Thus, if a user has a long working session with the worksheet and saves the workbook many times during that session, then they will need to unprotect the worksheet quite often. If you prefer, you can create a macro that will ask if the worksheet should be re-protected:
Private Sub Workbook_BeforeSave(ByVal SaveAsUI As Boolean, Cancel As Boolean)
    If MsgBox("Reprotect Sheet ABC?", vbYesNoCancel) = vbYes Then
        Sheets("ABC").Protect ("XYZ")
    End If
End Sub
Of course, this approach means that it is possible that a worksheet would not be protected again, if the user chose to not re-protect it.
Another approach doesn't involve using macros at all but uses a different way to do your protection. In traditional worksheet protection, you format individual cells as unlocked, then you apply protection to the worksheet so that any locked cells cannot be changed. If you don't mark any cells as unlocked (which seems to be what Barry is doing), then nothing in the worksheet can be changed without the password.
Starting with Excel 2002 you can actually protect individual ranges of cells within a worksheet. Follow these steps:
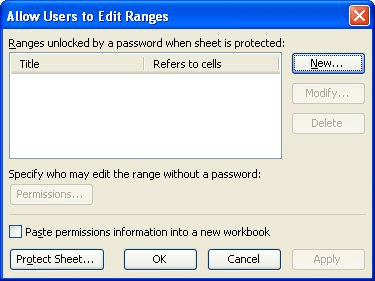
Figure 1. The Allow Users to Edit Ranges dialog box.
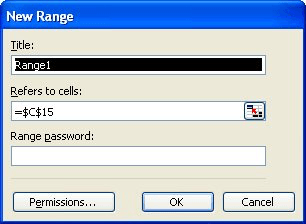
Figure 2. The New Range dialog box.
There is only one thing you need to remember when you protect your worksheet (step 9). Since you've not unlocked any cells, then all cells in the worksheet will be protected. You need to make sure that the protection you apply allows locked cells to be selected. If, after the worksheet is protected, a user tries to edit a cell that is in the range you specified in step 4, they are asked for the password you specified in step 5. When they provide it, they can make edits to any cells in the range.
The cool thing about this approach is that worksheet protection is not removed—the worksheet is still protected because the user never removed that protection. Thus, the user never needs to know the password for the entire worksheet. When the user closes and reopens the workbook, the worksheet is still protected, just as you need. Plus, you don't have the unavoidable downside of macros—that they can be disabled by a user when they open the workbook.
Note:
ExcelTips is your source for cost-effective Microsoft Excel training. This tip (11972) applies to Microsoft Excel 97, 2000, 2002, and 2003. You can find a version of this tip for the ribbon interface of Excel (Excel 2007 and later) here: Forcing a Worksheet to be Protected Again.

Solve Real Business Problems Master business modeling and analysis techniques with Excel and transform data into bottom-line results. This hands-on, scenario-focused guide shows you how to use the latest Excel tools to integrate data from multiple tables. Check out Microsoft Excel Data Analysis and Business Modeling today!
Excel allows you to "freeze" rows in your worksheet. What if you want the rows that are frozen to change as you scroll ...
Discover MoreWhen someone changes a cell in a worksheet, Excel normally goes along its merry way of keeping everything up to date. It ...
Discover MoreIf you need to work on two worksheets in the same workbook at the same time, Excel makes this rather easy to do. All you ...
Discover MoreFREE SERVICE: Get tips like this every week in ExcelTips, a free productivity newsletter. Enter your address and click "Subscribe."
There are currently no comments for this tip. (Be the first to leave your comment—just use the simple form above!)
Got a version of Excel that uses the menu interface (Excel 97, Excel 2000, Excel 2002, or Excel 2003)? This site is for you! If you use a later version of Excel, visit our ExcelTips site focusing on the ribbon interface.
FREE SERVICE: Get tips like this every week in ExcelTips, a free productivity newsletter. Enter your address and click "Subscribe."
Copyright © 2026 Sharon Parq Associates, Inc.
 Please Note:
This article is written for users of the following Microsoft Excel versions: 97, 2000, 2002, and 2003. If you are using a later version (Excel 2007 or later), this tip may not work for you. For a version of this tip written specifically for later versions of Excel, click here:
Please Note:
This article is written for users of the following Microsoft Excel versions: 97, 2000, 2002, and 2003. If you are using a later version (Excel 2007 or later), this tip may not work for you. For a version of this tip written specifically for later versions of Excel, click here:
Comments