Please Note: This article is written for users of the following Microsoft Excel versions: 97, 2000, 2002, and 2003. If you are using a later version (Excel 2007 or later), this tip may not work for you. For a version of this tip written specifically for later versions of Excel, click here: Setting Page Margins.
In Excel, page margins are used to specify how much white space (blank area) should be left around the information in your worksheet. This is very similar to how margins are conceived and used in other programs, such as a word processor. Margins are used to provide a visual border for your printed page and an area where the page can be held or bound.
To set margins for a worksheet, choose Page Setup from the File menu. Excel displays the Page Setup dialog box; you should make sure the Margins tab is selected. (See Figure 1.)
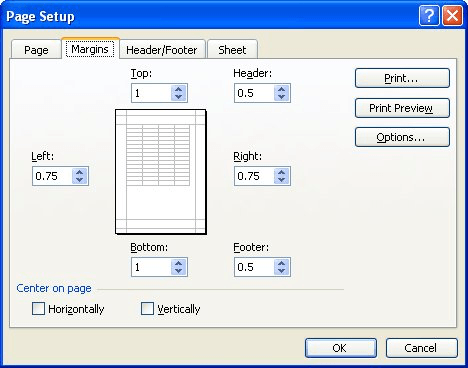
Figure 1. The Margins tab of the Page Setup dialog box.
There are four margins you can specify: top, bottom, left, and right. Each margin refers to the distance from the edge of the paper to where the information in your worksheet can be printed. Thus, a one-inch top margin means there will be one inch of white space at the top of each page of your printout.
If you include headers and footers in your page layout, the settings in the Header and Footer boxes allow you to indicate where they should print. Typically, the value in the Header field should be less than the value in the Top field, and the value in the Footer field should be less than the one in the Bottom field. In this way you will ensure that the header and footer appear within the margins specified at the top and bottom of the page.
At the bottom of the dialog box there are some check boxes that control the centering of your information on the page. Clicking your mouse on either the Horizontally or Vertically check boxes will make sure your information is centered in that direction. Notice that as you make changes to the margins or to the information centering, Excel shows you what your layout looks like in the Preview area in the center of the dialog box.
ExcelTips is your source for cost-effective Microsoft Excel training. This tip (2842) applies to Microsoft Excel 97, 2000, 2002, and 2003. You can find a version of this tip for the ribbon interface of Excel (Excel 2007 and later) here: Setting Page Margins.

Excel Smarts for Beginners! Featuring the friendly and trusted For Dummies style, this popular guide shows beginners how to get up and running with Excel while also helping more experienced users get comfortable with the newest features. Check out Excel 2019 For Dummies today!
If you ever open a workbook and find that your carefully crafted worksheets no longer print on the number of pages you ...
Discover MoreIf you want to cram more of your worksheet onto each page of a printout, one way to do it is by using scaling. Here's how ...
Discover MoreIf your worksheet is destined to be printed, you'll need to be concerned with how it appears on the page. One layout ...
Discover MoreFREE SERVICE: Get tips like this every week in ExcelTips, a free productivity newsletter. Enter your address and click "Subscribe."
There are currently no comments for this tip. (Be the first to leave your comment—just use the simple form above!)
Got a version of Excel that uses the menu interface (Excel 97, Excel 2000, Excel 2002, or Excel 2003)? This site is for you! If you use a later version of Excel, visit our ExcelTips site focusing on the ribbon interface.
FREE SERVICE: Get tips like this every week in ExcelTips, a free productivity newsletter. Enter your address and click "Subscribe."
Copyright © 2026 Sharon Parq Associates, Inc.
 Please Note:
This article is written for users of the following Microsoft Excel versions: 97, 2000, 2002, and 2003. If you are using a later version (Excel 2007 or later), this tip may not work for you. For a version of this tip written specifically for later versions of Excel, click here:
Please Note:
This article is written for users of the following Microsoft Excel versions: 97, 2000, 2002, and 2003. If you are using a later version (Excel 2007 or later), this tip may not work for you. For a version of this tip written specifically for later versions of Excel, click here:
Comments