Please Note: This article is written for users of the following Microsoft Excel versions: 97, 2000, 2002, and 2003. If you are using a later version (Excel 2007 or later), this tip may not work for you. For a version of this tip written specifically for later versions of Excel, click here: Two-Level Axis Labels.
Excel is great at creating charts. With some types of data, you may have a need for two-level axis labels for your chart. For instance, you may want something similar to the following along the X-axis for your chart:
  Pro | Team | Reg | Pro | Team | Reg ...
    Eastern US     |   Western US ...
Setting up such an arrangement in an Excel worksheet is easy, but getting the same result in a chart may not be as obvious.
Go ahead and set up your worksheet to reflect the column titles the way you want them. These column titles will end up as your X-axis labels. You could set them up as follows:
  |   A   |   B   |   C   |   D   |   E   |   F   |   G   |
1 |       |       Eastern US      |       Western US      |
2 |       |  Pro  |  Team |  Reg  |  Pro  |  Team |  Reg  |
With your table completed, you are ready to create the chart. Just select your data table, including all the headings in the first two rows, then create your chart. Excel automatically recognizes that you have two rows being used for the X-axis labels, and formats the chart correctly. (See Figure 1.) Since the X-axis labels appear beneath the chart data, the order of the label rows is reversed—exactly as mentioned at the first of this tip.
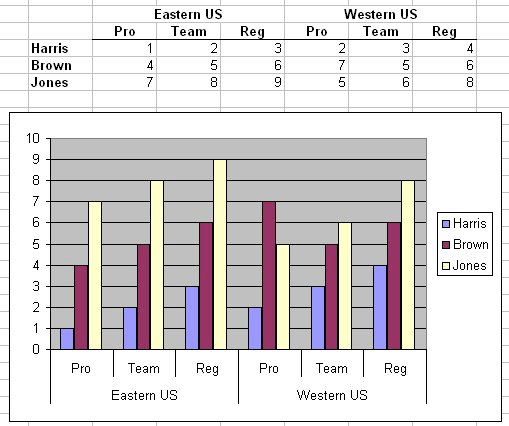
Figure 1. Two-level axis labels are created automatically by Excel.
ExcelTips is your source for cost-effective Microsoft Excel training. This tip (3203) applies to Microsoft Excel 97, 2000, 2002, and 2003. You can find a version of this tip for the ribbon interface of Excel (Excel 2007 and later) here: Two-Level Axis Labels.

Best-Selling VBA Tutorial for Beginners Take your Excel knowledge to the next level. With a little background in VBA programming, you can go well beyond basic spreadsheets and functions. Use macros to reduce errors, save time, and integrate with other Microsoft applications. Fully updated for the latest version of Office 365. Check out Microsoft 365 Excel VBA Programming For Dummies today!
Titles can be a great addition to any chart. They help provide explanatory information about the information in the ...
Discover MoreWant to draw a few simple shapes or lines on your worksheet? It really is simple; here's how to do it.
Discover MoreExcel doesn't just work with numbers and text. You can also add graphics objects to your worksheets, and then use Excel's ...
Discover MoreFREE SERVICE: Get tips like this every week in ExcelTips, a free productivity newsletter. Enter your address and click "Subscribe."
2022-09-01 09:51:52
VASILIKI SKIADA
Hello, is there a way to create a two level axis for a box plot (the chart available from the recommended charts).
This tip does not seem to apply to the box plot chart. Thank you.
2021-03-17 16:09:03
Bailey
How do you remove the vertical lines separating the groups under the x-axis?
2019-09-10 17:54:08
Pat Chmiel
I struggled with this for the better part of a day. Thank you!
Got a version of Excel that uses the menu interface (Excel 97, Excel 2000, Excel 2002, or Excel 2003)? This site is for you! If you use a later version of Excel, visit our ExcelTips site focusing on the ribbon interface.
FREE SERVICE: Get tips like this every week in ExcelTips, a free productivity newsletter. Enter your address and click "Subscribe."
Copyright © 2026 Sharon Parq Associates, Inc.
 Please Note:
This article is written for users of the following Microsoft Excel versions: 97, 2000, 2002, and 2003. If you are using a later version (Excel 2007 or later), this tip may not work for you. For a version of this tip written specifically for later versions of Excel, click here:
Please Note:
This article is written for users of the following Microsoft Excel versions: 97, 2000, 2002, and 2003. If you are using a later version (Excel 2007 or later), this tip may not work for you. For a version of this tip written specifically for later versions of Excel, click here:
Comments