Please Note: This article is written for users of the following Microsoft Excel versions: 97, 2000, 2002, and 2003. If you are using a later version (Excel 2007 or later), this tip may not work for you. For a version of this tip written specifically for later versions of Excel, click here: Two-Level Axis Labels.
Excel is great at creating charts. With some types of data, you may have a need for two-level axis labels for your chart. For instance, you may want something similar to the following along the X-axis for your chart:
  Pro | Team | Reg | Pro | Team | Reg ...
    Eastern US     |   Western US ...
Setting up such an arrangement in an Excel worksheet is easy, but getting the same result in a chart may not be as obvious.
Go ahead and set up your worksheet to reflect the column titles the way you want them. These column titles will end up as your X-axis labels. You could set them up as follows:
  |   A   |   B   |   C   |   D   |   E   |   F   |   G   |
1 |       |       Eastern US      |       Western US      |
2 |       |  Pro  |  Team |  Reg  |  Pro  |  Team |  Reg  |
With your table completed, you are ready to create the chart. Just select your data table, including all the headings in the first two rows, then create your chart. Excel automatically recognizes that you have two rows being used for the X-axis labels, and formats the chart correctly. (See Figure 1.) Since the X-axis labels appear beneath the chart data, the order of the label rows is reversed—exactly as mentioned at the first of this tip.
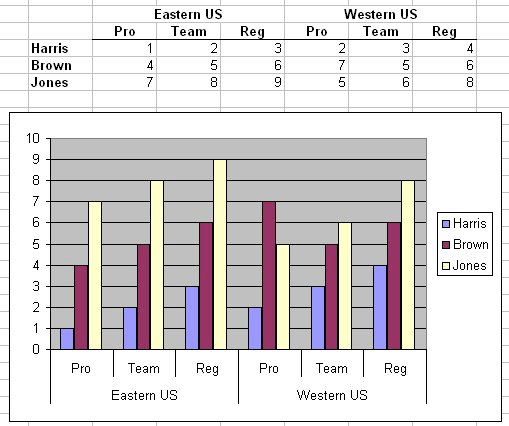
Figure 1. Two-level axis labels are created automatically by Excel.
ExcelTips is your source for cost-effective Microsoft Excel training. This tip (3203) applies to Microsoft Excel 97, 2000, 2002, and 2003. You can find a version of this tip for the ribbon interface of Excel (Excel 2007 and later) here: Two-Level Axis Labels.

Professional Development Guidance! Four world-class developers offer start-to-finish guidance for building powerful, robust, and secure applications with Excel. The authors show how to consistently make the right design decisions and make the most of Excel's powerful features. Check out Professional Excel Development today!
Using the copy and paste techniques you already know, you can copy and paste drawing objects. In this way, you can ...
Discover MoreYou can spice up your bar chart by using a graphic, of your choosing, to construct the bars. This tip shows how easy it ...
Discover MoreText boxes are handy for placing information in a container that can "float" over your worksheet. This tip explains what ...
Discover MoreFREE SERVICE: Get tips like this every week in ExcelTips, a free productivity newsletter. Enter your address and click "Subscribe."
2022-09-01 09:51:52
VASILIKI SKIADA
Hello, is there a way to create a two level axis for a box plot (the chart available from the recommended charts).
This tip does not seem to apply to the box plot chart. Thank you.
2021-03-17 16:09:03
Bailey
How do you remove the vertical lines separating the groups under the x-axis?
2019-09-10 17:54:08
Pat Chmiel
I struggled with this for the better part of a day. Thank you!
Got a version of Excel that uses the menu interface (Excel 97, Excel 2000, Excel 2002, or Excel 2003)? This site is for you! If you use a later version of Excel, visit our ExcelTips site focusing on the ribbon interface.
FREE SERVICE: Get tips like this every week in ExcelTips, a free productivity newsletter. Enter your address and click "Subscribe."
Copyright © 2026 Sharon Parq Associates, Inc.
 Please Note:
This article is written for users of the following Microsoft Excel versions: 97, 2000, 2002, and 2003. If you are using a later version (Excel 2007 or later), this tip may not work for you. For a version of this tip written specifically for later versions of Excel, click here:
Please Note:
This article is written for users of the following Microsoft Excel versions: 97, 2000, 2002, and 2003. If you are using a later version (Excel 2007 or later), this tip may not work for you. For a version of this tip written specifically for later versions of Excel, click here:
Comments