Please Note: This article is written for users of the following Microsoft Excel versions: 97, 2000, 2002, and 2003. If you are using a later version (Excel 2007 or later), this tip may not work for you. For a version of this tip written specifically for later versions of Excel, click here: Easily Entering Dispersed Data.
I needed to enter information into many rows of widely dispersed columns, like A, Q, BD, BJ, CF, etc. (I'm sure you get the idea.) I was right-arrowing along and I was thinking: if I were in Word I'd just set some tabs or bookmarks to move around quickly. What is the equivalent in Excel? A little delving into the Help files let me know that it's done like this:
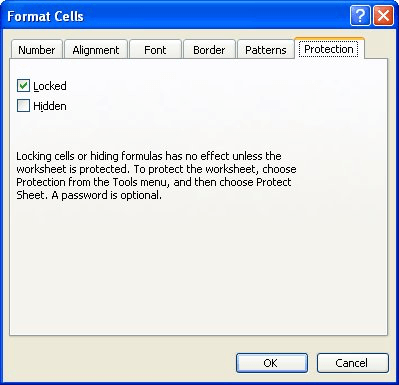
Figure 1. The Protection tab of the Format Cells dialog box.

Figure 2. The Protect Sheet dialog box.
That's it! Excel will only let you go to cells that are still editable, and those are the ones for which you cleared the Lock property before you protected the sheet. Enjoy tabbing to the places on your worksheet that you need to.
ExcelTips is your source for cost-effective Microsoft Excel training. This tip (3027) applies to Microsoft Excel 97, 2000, 2002, and 2003. You can find a version of this tip for the ribbon interface of Excel (Excel 2007 and later) here: Easily Entering Dispersed Data.

Professional Development Guidance! Four world-class developers offer start-to-finish guidance for building powerful, robust, and secure applications with Excel. The authors show how to consistently make the right design decisions and make the most of Excel's powerful features. Check out Professional Excel Development today!
When developing formulas, you may need to reference the very last value in a particular column. This can seem perplexing, ...
Discover MoreReferring to a range of cells on the current worksheet is easy. But what if you want to refer to a range on a number of ...
Discover MoreExcel has a great (and little known) shortcut for filling a column with information. It comes in very handy when you need ...
Discover MoreFREE SERVICE: Get tips like this every week in ExcelTips, a free productivity newsletter. Enter your address and click "Subscribe."
There are currently no comments for this tip. (Be the first to leave your comment—just use the simple form above!)
Got a version of Excel that uses the menu interface (Excel 97, Excel 2000, Excel 2002, or Excel 2003)? This site is for you! If you use a later version of Excel, visit our ExcelTips site focusing on the ribbon interface.
FREE SERVICE: Get tips like this every week in ExcelTips, a free productivity newsletter. Enter your address and click "Subscribe."
Copyright © 2026 Sharon Parq Associates, Inc.
 Please Note:
This article is written for users of the following Microsoft Excel versions: 97, 2000, 2002, and 2003. If you are using a later version (Excel 2007 or later), this tip may not work for you. For a version of this tip written specifically for later versions of Excel, click here:
Please Note:
This article is written for users of the following Microsoft Excel versions: 97, 2000, 2002, and 2003. If you are using a later version (Excel 2007 or later), this tip may not work for you. For a version of this tip written specifically for later versions of Excel, click here:
Comments