When you insert a comment into a worksheet cell, Excel places the user's name on the first line of the comment balloon in bold type. The insertion point is then at the beginning of the next line, ready for your to type. What you type is inserted, by default, in 8-point Tahoma.
If you want a larger font used for your comment, you can change the character formatting of anything within the comment itself. Just select the text, then use the controls on the Formatting toolbar or by choosing Comment from the Format menu.
Excel does not provide a way for you to change the default font specifications for comment balloons, across the board. You can change them individually (as already mentioned), but not universally within Excel. You can make a change in Windows that will affect the comment font, however. Follow these general instructions:
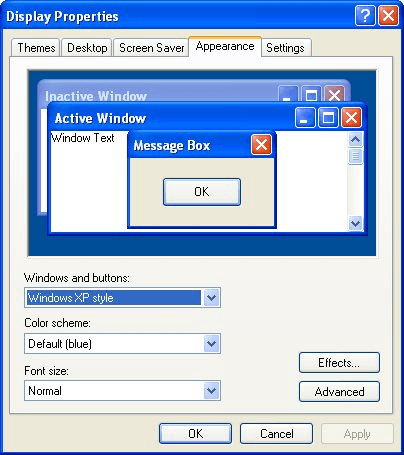
Figure 1. The Appearance tab of the Display Properties dialog box.

Figure 2. The Advanced Appearance dialog box.
In case you didn't figure it out from these steps, the font used in the comment balloons of Excel is determined by the ToolTip font used by Windows. Changing the ToolTip font changes the comment balloons, but it also changes things in other applications besides Excel, as well. (Of course, if you think the font is too small in the comment balloons, you also probably think the font is too small everywhere else the ToolTip font is used.)
If you prefer to not change the ToolTip font, you can create an Excel macro that will step through all the comments in a worksheet to make changes.
Sub FixComments()
    Dim cmt As Comment

    For Each cmt In ActiveSheet.Comments
        With cmt.Shape.TextFrame.Characters.Font
            .Name = "Arial"
            .Size = 12
        End With
    Next cmt
End Sub
This macro changes the font to 12-point Arial for all comments. You could easily change the font and font size by making a change to the appropriate two lines of the macro.
Note:
ExcelTips is your source for cost-effective Microsoft Excel training. This tip (2974) applies to Microsoft Excel 97, 2000, 2002, and 2003.

Dive Deep into Macros! Make Excel do things you thought were impossible, discover techniques you won't find anywhere else, and create powerful automated reports. Bill Jelen and Tracy Syrstad help you instantly visualize information to make it actionable. You�ll find step-by-step instructions, real-world case studies, and 50 workbooks packed with examples and solutions. Check out Microsoft Excel 2019 VBA and Macros today!
Need to cram a bunch of text all on a single line in a cell? You can do it with one of the lesser-known settings in Excel.
Discover MoreMost formatting needs are met by using the predefined formatting options in Excel. The program also allows you to move ...
Discover MoreWant to change the size of the font within a worksheet? Excel allows you to choose from a list of sizes, as well as ...
Discover MoreFREE SERVICE: Get tips like this every week in ExcelTips, a free productivity newsletter. Enter your address and click "Subscribe."
There are currently no comments for this tip. (Be the first to leave your comment—just use the simple form above!)
Got a version of Excel that uses the menu interface (Excel 97, Excel 2000, Excel 2002, or Excel 2003)? This site is for you! If you use a later version of Excel, visit our ExcelTips site focusing on the ribbon interface.
FREE SERVICE: Get tips like this every week in ExcelTips, a free productivity newsletter. Enter your address and click "Subscribe."
Copyright © 2026 Sharon Parq Associates, Inc.
Comments