Please Note: This article is written for users of the following Microsoft Excel versions: 97, 2000, 2002, and 2003. If you are using a later version (Excel 2007 or later), this tip may not work for you. For a version of this tip written specifically for later versions of Excel, click here: Exporting Latitude and Longitude.
Written by Allen Wyatt (last updated February 19, 2022)
This tip applies to Excel 97, 2000, 2002, and 2003
Deidre uses an Excel worksheet to store latitude and longitude values. These values are entered in cells in the format 26:05:35, which Excel interprets as hours, minutes, and seconds. Internally, Excel converts the entry into an internal date value. This means that the value is stored internally as the serial number 1.08721064814815, but is displayed, automatically, in the elapsed time format.
Deidre is running into a problem when she tries to use the data in the worksheet with a different program that needs the latitude and longitudes values in text format. In other words, she needs them in a text file in the format 26:05:35, not in some other date/time representation that may be picked by Excel.
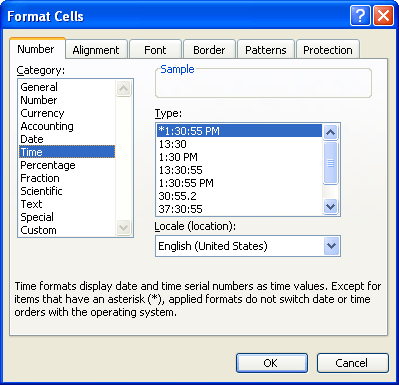
The first thing to try is to select all the cells that contain latitudes and longitudes, and make sure they are formatted properly. Follow these steps:

Figure 1. The Format Cells dialog box.
Now you should be able to save the file in text format, and the latitudes and longitudes will look as expected:
When done, you should be able to open the Excel-created text file and see that it contains the latitudes and longitudes in the format wanted. If it doesn't (for some bizarre reason), then you should try the following:
=TEXT(A3,"[h]:mm:ss")

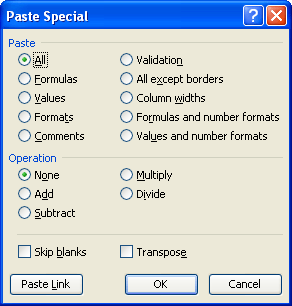
Figure 2. The Paste Special dialog box.
The formula used in step 2 probably bears some explanation. It takes the value in A3 (the date serial value) and formats it as elapsed time, but as text. This is the format in which you ultimately want the values. You should now be able to save your worksheet as a text file (use the steps provided earlier in this tip), and the latitudes and longitudes should be formatted as expected.
ExcelTips is your source for cost-effective Microsoft Excel training. This tip (2770) applies to Microsoft Excel 97, 2000, 2002, and 2003. You can find a version of this tip for the ribbon interface of Excel (Excel 2007 and later) here: Exporting Latitude and Longitude.

Solve Real Business Problems Master business modeling and analysis techniques with Excel and transform data into bottom-line results. This hands-on, scenario-focused guide shows you how to use the latest Excel tools to integrate data from multiple tables. Check out Microsoft Excel Data Analysis and Business Modeling today!
Want Excel to automatically adjust the height of a worksheet row when it wraps text within the cell? It's easy to do, ...
Discover MoreCells in a worksheet defined by the intersection of rows and columns. If you adjust row height and column width just ...
Discover MoreSometimes Excel does things that may appear just plain wacky. This particular tip deals with an issue that could crop up ...
Discover MoreFREE SERVICE: Get tips like this every week in ExcelTips, a free productivity newsletter. Enter your address and click "Subscribe."
There are currently no comments for this tip. (Be the first to leave your comment—just use the simple form above!)
Got a version of Excel that uses the menu interface (Excel 97, Excel 2000, Excel 2002, or Excel 2003)? This site is for you! If you use a later version of Excel, visit our ExcelTips site focusing on the ribbon interface.
FREE SERVICE: Get tips like this every week in ExcelTips, a free productivity newsletter. Enter your address and click "Subscribe."
Copyright © 2026 Sharon Parq Associates, Inc.
Comments