Please Note: This article is written for users of the following Microsoft Excel versions: 97, 2000, 2002, and 2003. If you are using a later version (Excel 2007 or later), this tip may not work for you. For a version of this tip written specifically for later versions of Excel, click here: Copying Headers and Footers.
Written by Allen Wyatt (last updated October 31, 2020)
This tip applies to Excel 97, 2000, 2002, and 2003
Excel allows you to specify headers and footers for your worksheets. You may want to copy these headers and footers from one worksheet to another. Doing so within a workbook is relatively easy, but doing so from one workbook to another can be more daunting.
If the header and footer is one you use quite a bit in new workbooks, and your main concern is to have the header and footer available in those new workbooks (not in existing workbooks), then the best approach would be to create a template workbook. Just set up a workbook as desired, including the specification of headers and footers. Then, save the workbook as an Excel template (XLT format). You can then create your workbooks based on this template and it will have the headers and footers you desire.
One way to copy headers and footers from a worksheet in one workbook to a worksheet in another is to use the traditional editing methods of copying and pasting. In other words, you can select the header material you want to copy, press Ctrl+C, display the header in the target worksheet, and then press Ctrl+V. The drawback to this approach is that it can involve quite a few steps. After all, there are three sections (left, center, and right) for each header and three for each footer. This means that you must do six copy and paste operations to copy the complete header and footer.
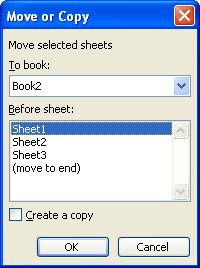
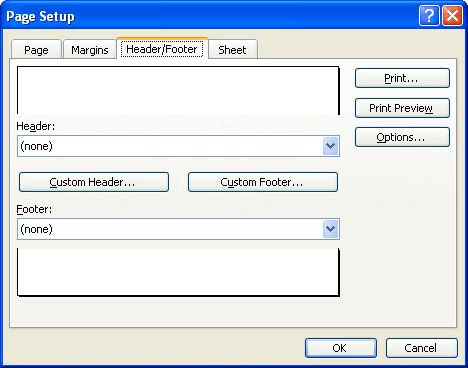
Another way to copy headers and footers from one workbook to another involves the use of native Excel commands to make copies of worksheets. Follow these steps:

Figure 1. The Move or Copy dialog box.

Figure 2. The Header/Footer tab of the Page Setup dialog box.
What you essentially did is to copy the worksheet containing the header and footer you desired, then you copied that header and footer to other worksheets in the workbook, then you deleted the original worksheet.
While these steps work fine, they can be tedious if you need to copy headers and footers to a number of different workbooks. In this case, using a macro to do the copying is the saner approach. The following two macros can be used to copy headers and footers in one simple step. All you need to do is display the source worksheet and use the GetHeaders macro. This macro copies the header and footer information to string variables. You can then display, in turn, each worksheet that you want to have the same header and footer and run the DoHeaders macro.
Option Explicit

Dim strHeadLeft As String
Dim strHeadCenter As String
Dim strHeadRight As String
Dim strFootLeft As String
Dim strFootCenter As String
Dim strFootRight As String
Dim bGotHeaders As Boolean

Sub GetHeaders()
    With ActiveSheet.PageSetup
        strHeadLeft = .LeftHeader
        strHeadCenter = .CenterHeader
        strHeadRight = .RightHeader
        strFootLeft = .LeftFooter
        strFootCenter = .CenterFooter
        strFootRight = .RightFooter
        bGotHeaders = True
    End With
End Sub
Sub DoHeaders()
    If bGotHeaders Then
        With ActiveSheet.PageSetup
            .LeftHeader = strHeadLeft
            .CenterHeader = strHeadCenter
            .RightHeader = strHeadRight
            .LeftFooter = strFootLeft
            .CenterFooter = strFootCenter
            .RightFooter = strFootRight
        End With
    Else
        MsgBox "Select the sheet with the " _
            & "headers you want to copy," _
            & vbCrLf & "then run 'GetHeaders'", _
            vbExclamation, "No Headers In Memory"
    End If
End Sub
You could even assign the macros to toolbar buttons, if desired, which can make them even handier for copying headers and footers.
If you have quite a few worksheets and workbooks into which you want the headers and footers copied, there is a different macro approach you can use. The following macro will copy the headers and footers from the active worksheet to all other worksheets in all other open workbooks.
Sub CopyHeaderFooter()
    Dim PS As PageSetup
    Dim WB As Workbook
    Dim WS As Worksheet

    Set PS = ActiveSheet.PageSetup
    For Each WB In Workbooks
        For Each WS In WB.Worksheets
            With WS.PageSetup
                .LeftHeader = PS.LeftHeader
                .CenterHeader = PS.CenterHeader
                .RightHeader = PS.RightHeader
                .LeftFooter = PS.LeftFooter
                .CenterFooter = PS.CenterFooter
                .RightFooter = PS.RightFooter
            End With
        Next
    Next
End Sub
In other words, if you want to copy headers and footers from the current worksheet to 150 other worksheets spread across 15 different workbooks, all you need to do is open the 15 workbooks at the same time, display the source worksheet, and run the macro.
Note:
ExcelTips is your source for cost-effective Microsoft Excel training. This tip (2696) applies to Microsoft Excel 97, 2000, 2002, and 2003. You can find a version of this tip for the ribbon interface of Excel (Excel 2007 and later) here: Copying Headers and Footers.

Excel Smarts for Beginners! Featuring the friendly and trusted For Dummies style, this popular guide shows beginners how to get up and running with Excel while also helping more experienced users get comfortable with the newest features. Check out Excel 2019 For Dummies today!
Using a macro to add the full path name into a header or footer in an Excel worksheet.
Discover MoreWant to print different headers or footers on different parts of your worksheet? Excel has no inherent way to do this, ...
Discover MoreExcel allows you to add footers to the worksheets you create. If you decide you don't need a footer any more, here's how ...
Discover MoreFREE SERVICE: Get tips like this every week in ExcelTips, a free productivity newsletter. Enter your address and click "Subscribe."
2023-02-28 03:39:22
ZS
This is good but it doesn't work if there is an image in the header, which I've been trying to do for ages now.
I have not yet found a way to copy the image from one header to the headers of all tabs in the workbook.
2020-10-31 07:09:34
Mohammad Ahmed
Sir how can I change header and footer in excel for multiple work books altogether . Any VBA .thanks
Got a version of Excel that uses the menu interface (Excel 97, Excel 2000, Excel 2002, or Excel 2003)? This site is for you! If you use a later version of Excel, visit our ExcelTips site focusing on the ribbon interface.
FREE SERVICE: Get tips like this every week in ExcelTips, a free productivity newsletter. Enter your address and click "Subscribe."
Copyright © 2026 Sharon Parq Associates, Inc.
Comments