Please Note: This article is written for users of the following Microsoft Excel versions: 97, 2000, 2002, and 2003. If you are using a later version (Excel 2007 or later), this tip may not work for you. For a version of this tip written specifically for later versions of Excel, click here: Choosing Direction after Enter On a Workbook Basis.
When you press Enter after typing information into a cell, Excel normally saves your information and then moves to the next cell beneath the one where you pressed Enter. You can modify this behavior, however:
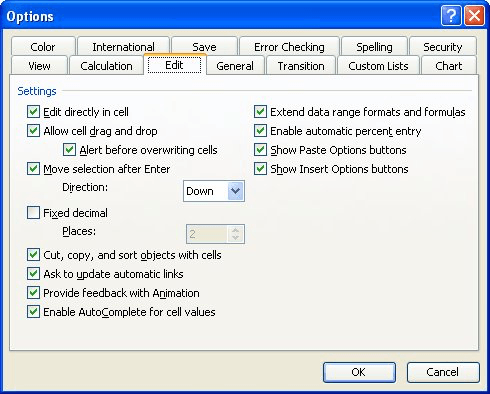
Figure 1. The Edit tab of the Options dialog box.
If you have a need to vary the Enter key behavior on a workbook-by-workbook basis, you might think you are out of luck. You can, however, use a little creative macro code to specify which direction you want to go after Enter, and have that code run whenever a workbook is activated.
For instance, let's say that you had a particular workbook, and you always want to move the selection up after pressing Enter. In this particular workbook, you can add the following code to the thisWorkbook object in the VBA editor:
Private Sub Workbook_WindowActivate(ByVal Wn As Excel.Window)
    bMove = Application.MoveAfterReturn
    lMoveDirection = Application.MoveAfterReturnDirection

    Application.MoveAfterReturn = True
    Application.MoveAfterReturnDirection = xlUp
End Sub

Private Sub Workbook_WindowDeactivate(ByVal Wn As Excel.Window)
    Application.MoveAfterReturn = bMove
    Application.MoveAfterReturnDirection = lMoveDirection
End Sub
There are two separate subroutines here. The first one runs whenever the window for the workbook is activated. In this case, it stores the settings associated with the MoveAfterReturn and MoveAfterReturnDirection properties into variables. (You will learn about these variables shortly.) The macro then sets the MoveAfterReturn property to True and sets the direction to xlUp. If you want to go a different direction by default in this particular workbook, simply use a different Excel constant, such as xlDown, xlToLeft, or xlToRight.
The second subroutine runs whenever the workbook window is deactivated. In this case, the values of the MoveAfterReturn and MoveAfterReturnDirection properties are reset to what they were before the workbook was first activated.
The two variables used in these routines, lMoveDirection and bMove, need to be defined in the declaration portion of any module. This allows the variables to be accessed from both of the above routines.
Public lMoveDirection As Long
Public bMove As Boolean
Note:
ExcelTips is your source for cost-effective Microsoft Excel training. This tip (2073) applies to Microsoft Excel 97, 2000, 2002, and 2003. You can find a version of this tip for the ribbon interface of Excel (Excel 2007 and later) here: Choosing Direction after Enter On a Workbook Basis.

Program Successfully in Excel! This guide will provide you with all the information you need to automate any task in Excel and save time and effort. Learn how to extend Excel's functionality with VBA to create solutions not possible with the standard features. Includes latest information for Excel 2024 and Microsoft 365. Check out Mastering Excel VBA Programming today!
Press the up or down arrow keys, and you expect Excel to change which cell is selected. If this doesn't occur on your ...
Discover MoreSelect a large range of cells and you may later want to remove a few cells from that selection. This is not as easy as ...
Discover MoreHave you ever pressed the Tab key, expecting to move to the next cell in your worksheet, only to have Excel completely ...
Discover MoreFREE SERVICE: Get tips like this every week in ExcelTips, a free productivity newsletter. Enter your address and click "Subscribe."
There are currently no comments for this tip. (Be the first to leave your comment—just use the simple form above!)
Got a version of Excel that uses the menu interface (Excel 97, Excel 2000, Excel 2002, or Excel 2003)? This site is for you! If you use a later version of Excel, visit our ExcelTips site focusing on the ribbon interface.
FREE SERVICE: Get tips like this every week in ExcelTips, a free productivity newsletter. Enter your address and click "Subscribe."
Copyright © 2026 Sharon Parq Associates, Inc.
 Please Note:
This article is written for users of the following Microsoft Excel versions: 97, 2000, 2002, and 2003. If you are using a later version (Excel 2007 or later), this tip may not work for you. For a version of this tip written specifically for later versions of Excel, click here:
Please Note:
This article is written for users of the following Microsoft Excel versions: 97, 2000, 2002, and 2003. If you are using a later version (Excel 2007 or later), this tip may not work for you. For a version of this tip written specifically for later versions of Excel, click here:
Comments