Please Note: This article is written for users of the following Microsoft Excel versions: 97, 2000, 2002, and 2003. If you are using a later version (Excel 2007 or later), this tip may not work for you. For a version of this tip written specifically for later versions of Excel, click here: Using Check Boxes.
Written by Allen Wyatt (last updated September 9, 2023)
This tip applies to Excel 97, 2000, 2002, and 2003
Many different dialog boxes and forms in the Windows world utilize check boxes. They are handy if you want to provide a way for a user to choose between two options, such as true or false; yes or no. Excel allows you to use check boxes in your worksheets, if desired.
For instance, you may have developed a financial projection worksheet in which you can either account for a particular acquisition or not. In this case, you might want to place a check box at the top of the worksheet. You can then link the status of this check box to another cell, so that if the check box is selected, the value of the cell is True; if it is not selected, the value of the cell is False.
To place a check box control in your worksheet, follow these steps:

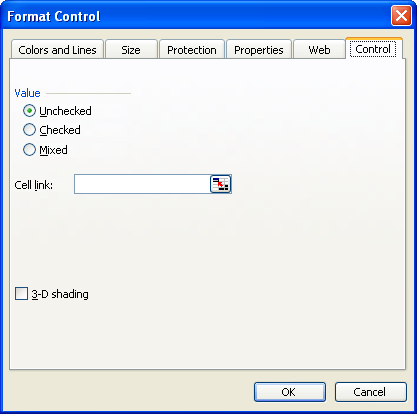
Figure 1. The Control tab of the Format Control dialog box.
ExcelTips is your source for cost-effective Microsoft Excel training. This tip (3246) applies to Microsoft Excel 97, 2000, 2002, and 2003. You can find a version of this tip for the ribbon interface of Excel (Excel 2007 and later) here: Using Check Boxes.

Save Time and Supercharge Excel! Automate virtually any routine task and save yourself hours, days, maybe even weeks. Then, learn how to make Excel do things you thought were simply impossible! Mastering advanced Excel macros has never been easier. Check out Excel 2010 VBA and Macros today!
Lots of people prefer to enter information directly into Excel, but there is another way that may be helpful: Using data ...
Discover MoreAs components of the Microsoft Office suite, one would expect Excel and Word to work together. One of the most common ...
Discover MoreWhen you no longer need a view, you can get rid of it by deleting it. Deleting unnecessary views is a good idea because ...
Discover MoreFREE SERVICE: Get tips like this every week in ExcelTips, a free productivity newsletter. Enter your address and click "Subscribe."
There are currently no comments for this tip. (Be the first to leave your comment—just use the simple form above!)
Got a version of Excel that uses the menu interface (Excel 97, Excel 2000, Excel 2002, or Excel 2003)? This site is for you! If you use a later version of Excel, visit our ExcelTips site focusing on the ribbon interface.
FREE SERVICE: Get tips like this every week in ExcelTips, a free productivity newsletter. Enter your address and click "Subscribe."
Copyright © 2025 Sharon Parq Associates, Inc.
Comments