Please Note: This article is written for users of the following Microsoft Excel versions: 97, 2000, 2002, and 2003. If you are using a later version (Excel 2007 or later), this tip may not work for you. For a version of this tip written specifically for later versions of Excel, click here: Using Data Forms.
Written by Allen Wyatt (last updated July 27, 2024)
This tip applies to Excel 97, 2000, 2002, and 2003
A data form is used to allow easy manipulation of information in an Excel data list. While a list is small—for instance, when it fits on one screen—it is easier to enter or change information directly. When you start getting a larger number of records, then you may find using a data form to be easier.
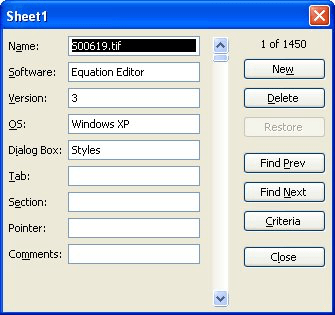
A data form is a dialog box that displays one complete record from your list at a time. Excel considers a record to be a single row in your data list, so a data form basically extracts the information from a row, uses the field labels from the first row of the list, and displays the information so you can understand it easier. To utilize a data form, follow these two simple steps:

Figure 1. A sample data form.
There are several important items to note when working with data forms. The title that appears at the top of the data form is taken directly from the name of the worksheet on which the data resides. If you want to change the title, simply change the name of the worksheet tab.
The field labels are listed down the left side, and you can input information to the right of these labels. If a field contains a formula, you cannot enter information in that field; it is calculated automatically.
You can move between entry fields by pressing the Tab key. When you press Enter, any changes you make are saved in the record. The buttons at the right side of the data form are used to navigate through the list. If you click your mouse on the Close button, the data form is removed and you are returned to your worksheet.
Notice that there are several searching buttons located along the right side of the data form. The Find Prev and Find Next buttons are used to step through your list. If you click on the Criteria button, you can enter information that will be used by the other search buttons (Find Prev and Find Next) when displaying records.
ExcelTips is your source for cost-effective Microsoft Excel training. This tip (2973) applies to Microsoft Excel 97, 2000, 2002, and 2003. You can find a version of this tip for the ribbon interface of Excel (Excel 2007 and later) here: Using Data Forms.

Dive Deep into Macros! Make Excel do things you thought were impossible, discover techniques you won't find anywhere else, and create powerful automated reports. Bill Jelen and Tracy Syrstad help you instantly visualize information to make it actionable. You’ll find step-by-step instructions, real-world case studies, and 50 workbooks packed with examples and solutions. Check out Microsoft Excel 2019 VBA and Macros today!
Need to display your worksheet in different ways? A quick way to do this is to create views, as described in this tip.
Discover MoreList boxes can be a great tool for getting input from users of your worksheets. This tip describes what list boxes are ...
Discover MoreAutoFill can be a real timesaver if you often work with set lists of data. You can define your own custom lists and then ...
Discover MoreFREE SERVICE: Get tips like this every week in ExcelTips, a free productivity newsletter. Enter your address and click "Subscribe."
There are currently no comments for this tip. (Be the first to leave your comment—just use the simple form above!)
Got a version of Excel that uses the menu interface (Excel 97, Excel 2000, Excel 2002, or Excel 2003)? This site is for you! If you use a later version of Excel, visit our ExcelTips site focusing on the ribbon interface.
FREE SERVICE: Get tips like this every week in ExcelTips, a free productivity newsletter. Enter your address and click "Subscribe."
Copyright © 2026 Sharon Parq Associates, Inc.
Comments