Written by Allen Wyatt (last updated May 30, 2020)
This tip applies to Excel 97, 2000, 2002, and 2003
Excel provides several controls that help you control exactly what you print. Normally when you print, you would print the entire worksheet. However, Excel allows you to specify that only specific pages of the worksheet be printed. This comes in handy if you have used Page Break Preview or Print Preview to look at your worksheet, and you determine that you don't need all the pages that Excel would otherwise print. To print only selected pages, follow these steps:
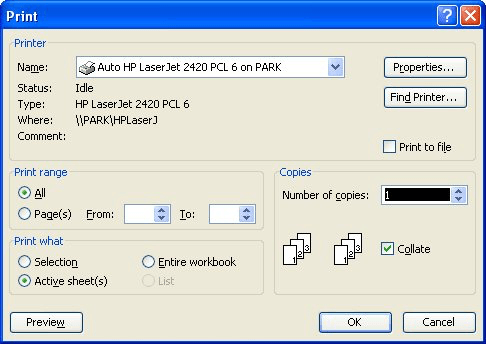
Figure 1. The Print dialog box.
When you specify the pages to print, in step 2, you can separate page numbers by commas. Thus, if you wanted to print pages 4 and 7, you should enter "4,7" (without the quote marks) in the Pages area of the dialog box. You can also specify ranges of pages to print. This means if you wanted to print pages 3 through 5 and page 9, you would enter "3-5,9" (again without the quote marks).
ExcelTips is your source for cost-effective Microsoft Excel training. This tip (3241) applies to Microsoft Excel 97, 2000, 2002, and 2003.
Save Time and Supercharge Excel! Automate virtually any routine task and save yourself hours, days, maybe even weeks. Then, learn how to make Excel do things you thought were simply impossible! Mastering advanced Excel macros has never been easier. Check out Excel 2010 VBA and Macros today!
Got a bunch of worksheets and you want to save paper by printing multiple worksheets on a single piece of paper? There ...
Discover MoreWhen printing information in a workbook, you may want to take advantage of the different print quality settings available ...
Discover MoreNeed to print out comments, but in a way that you control what is included in the printout? Here's a way you can extract ...
Discover MoreFREE SERVICE: Get tips like this every week in ExcelTips, a free productivity newsletter. Enter your address and click "Subscribe."
There are currently no comments for this tip. (Be the first to leave your comment—just use the simple form above!)
Got a version of Excel that uses the menu interface (Excel 97, Excel 2000, Excel 2002, or Excel 2003)? This site is for you! If you use a later version of Excel, visit our ExcelTips site focusing on the ribbon interface.
FREE SERVICE: Get tips like this every week in ExcelTips, a free productivity newsletter. Enter your address and click "Subscribe."
Copyright © 2025 Sharon Parq Associates, Inc.
Comments