Changing the Color Used to Denote Selected Cells

Written by Allen Wyatt (last updated November 26, 2020)
This tip applies to Excel 97, 2000, 2002, and 2003


3

Whenever you select a range of cells to enter data, the active cell is white and all the other cells in the range are a contrasting color. As you enter data and then press the Enter key, that cell becomes the contrasting color and the next cell becomes the active cell and is white. You may wonder how to change the contrasting color to make the selected range stand out more.

The colors used by Excel when you select items are controlled not by Excel, but by Windows. You can change the selection color, but you should understand that when you do so it may affect other programs besides just Excel. The exact steps you follow depend on your version of Windows. If you are using Windows XP, follow these steps:

  1. Get out of Excel.
  2. Right-click anywhere in your Windows desktop. (Make sure you right-click on the desktop itself, not on any of the objects on the desktop.) Windows presents a Context menu.
  3. Choose Properties from the Context menu. Windows displays the Display Properties dialog box.
  4. Make sure the Appearance tab is selected.
  5. Click the Advanced button. Windows displays the Advanced Appearance dialog box. (See Figure 1.)
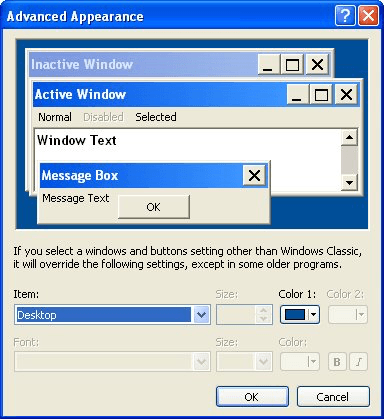
  6. Figure 1. The Advanced Appearance dialog box.

  7. Using the Item drop-down list, choose the Selected Items option.
  8. Using the Color 1 drop-down list, choose the color you want Windows to use when you select items.
  9. Click OK to close the Advanced Appearance dialog box.
  10. Click OK to close the Display Properties dialog box.

If you are using Vista, follow these steps instead:

  1. Get out of Excel.
  2. Right-click anywhere in your Windows desktop. (Make sure you right-click on the desktop itself, not on any of the objects on the desktop.) Windows presents a Context menu.
  3. Choose Personalize from the Context menu. Windows displays the Personalization dialog box.
  4. Click Window Color and Appearance.
  5. Click the Open Classic Appearance Properties for More Color Options link. Windows displays the Appearance Settings dialog box.
  6. Click the Advanced button. Windows displays the Advanced Appearance dialog box.
  7. Using the Item drop-down list, choose the Selected Items option.
  8. Using the Color 1 drop-down list, choose the color you want Windows to use when you select items.
  9. Click OK to close the Advanced Appearance dialog box.
  10. Click OK to close the Appearance Settings dialog box.
  11. Close the Control Panel window.

ExcelTips is your source for cost-effective Microsoft Excel training. This tip (8261) applies to Microsoft Excel 97, 2000, 2002, and 2003.

Author Bio

Allen Wyatt

With more than 50 non-fiction books and numerous magazine articles to his credit, Allen Wyatt is an internationally recognized author. He is president of Sharon Parq Associates, a computer and publishing services company. ...

MORE FROM ALLEN

Scrolling Up and Down

Need an easy way to move through a spreadsheet using a mouse? Here are a couple of ideas.

Discover More

Getting the Name of the Worksheet Into a Cell

Excel allows you to change the names assigned to the worksheets in a workbook. If you want to have those names appear in ...

Discover More

Changing the Color of a List of Words

The Find and Replace tool is very powerful. If you need to use it many, many times in a row, however, it can quickly get ...

Discover More

Dive Deep into Macros! Make Excel do things you thought were impossible, discover techniques you won't find anywhere else, and create powerful automated reports. Bill Jelen and Tracy Syrstad help you instantly visualize information to make it actionable. You’ll find step-by-step instructions, real-world case studies, and 50 workbooks packed with examples and solutions. Check out Microsoft Excel 2019 VBA and Macros today!

More ExcelTips (menu)

Task Pane Doesn't Appear Properly

Excel 2002 and 2003 include a Task pane that provides quick access to common tasks. The Task pane is normally visible ...

Discover More

Hiding a Huge Number of Rows

Need to hide a large number of rows? It's easy to do if you combine a few keyboard shortcuts. Here are several techniques ...

Discover More

Clearing Large Clipboard Entries

Need to clear out a large amount of information saved on the Clipboard? All you need to do is to replace it with a small ...

Discover More
Subscribe

FREE SERVICE: Get tips like this every week in ExcelTips, a free productivity newsletter. Enter your address and click "Subscribe."

View most recent newsletter.

Comments

If you would like to add an image to your comment (not an avatar, but an image to help in making the point of your comment), include the characters [{fig}] (all 7 characters, in the sequence shown) in your comment text. You’ll be prompted to upload your image when you submit the comment. Maximum image size is 6Mpixels. Images larger than 600px wide or 1000px tall will be reduced. Up to three images may be included in a comment. All images are subject to review. Commenting privileges may be curtailed if inappropriate images are posted.

What is nine minus 1?

2021-02-03 12:55:15

Pat

Do you have an answer for Win 10 excel 365? They don't seem to take into consideration people with vision issues.


2016-08-21 18:56:14

nancy golden

My work computer has now been updated to windows 8.1 (soon to be updated again). We run office 2016.
The problem in this article is EXACTLY what I'm looking to solve. Unfortunately, I can't find any context menu. The closest ones I find don't give you the options you showed.

Any ideas? I need to be able to easily look at a spreadsheet and locate the cells that have been "found"...but they're virtually impossible to see.
Thanks.


2016-04-24 12:13:58

JMJ

Thank you for maintaining your so useful tips for those who still use XP!
(I know it's bad, but I just can't refrain :-)


This Site

Got a version of Excel that uses the menu interface (Excel 97, Excel 2000, Excel 2002, or Excel 2003)? This site is for you! If you use a later version of Excel, visit our ExcelTips site focusing on the ribbon interface.

Newest Tips
Subscribe

FREE SERVICE: Get tips like this every week in ExcelTips, a free productivity newsletter. Enter your address and click "Subscribe."

(Your e-mail address is not shared with anyone, ever.)

View the most recent newsletter.