Please Note: This article is written for users of the following Microsoft Excel versions: 97, 2000, 2002, and 2003. If you are using a later version (Excel 2007 or later), this tip may not work for you. For a version of this tip written specifically for later versions of Excel, click here: Checking Lock Status of Cells.
Written by Allen Wyatt (last updated June 28, 2025)
This tip applies to Excel 97, 2000, 2002, and 2003
Excel allows you to easily change whether a cell is formatted as locked or unlocked. This attribute is handled on a cell-by-cell basis, even though the effects of the locking (or unlocking) are not evident until such point as you protect the entire worksheet.
Since locking and unlocking can be done on an individual cell basis, you may wonder if there is a way to display the lock status (locked or unlocked) of all your cells in a worksheet, at one time, without the need to check each cell individually.
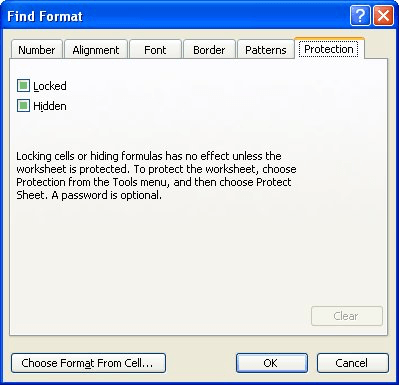
The default lock status for cells is locked, so it probably makes more sense to select those cells that are unlocked. One way you can do that is to follow these steps, if you are using Excel 2003:

Figure 1. The Protection tab of the Find Format dialog box.
At this point, Excel will do one of two things. If it finds any unlocked cells, the addresses of those cells are listed on the screen. If it doesn't find any unlocked cells, then it informs you that it can't find them.
The above technique only works in Excel 2003 because the capability to search for formatting was only added in that version of Excel. Regardless of the version you are using, you can use conditional formatting to highlight unlocked cells. Follow these steps:

Figure 2. The Conditional Formatting dialog box.
=CELL("protect",A1)=0

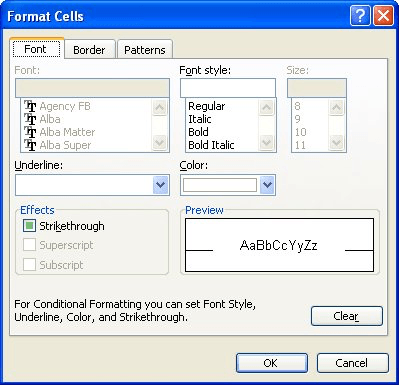
Figure 3. The Format Cells dialog box.
Now all the cells in your worksheet that are unlocked will have the formatting you defined in step 6.
ExcelTips is your source for cost-effective Microsoft Excel training. This tip (10765) applies to Microsoft Excel 97, 2000, 2002, and 2003. You can find a version of this tip for the ribbon interface of Excel (Excel 2007 and later) here: Checking Lock Status of Cells.

Best-Selling VBA Tutorial for Beginners Take your Excel knowledge to the next level. With a little background in VBA programming, you can go well beyond basic spreadsheets and functions. Use macros to reduce errors, save time, and integrate with other Microsoft applications. Fully updated for the latest version of Office 365. Check out Microsoft 365 Excel VBA Programming For Dummies today!
You've protected and saved your worksheet with explicit instructions that you be allowed to insert and delete rows. But ...
Discover MoreWhen you protect a worksheet, one of the benefits is that you can limit which cells can be used for data entry. How a ...
Discover MoreWhen you share a protected workbook with other people, you may not want them to get around the protection by creating a ...
Discover MoreFREE SERVICE: Get tips like this every week in ExcelTips, a free productivity newsletter. Enter your address and click "Subscribe."
There are currently no comments for this tip. (Be the first to leave your comment—just use the simple form above!)
Got a version of Excel that uses the menu interface (Excel 97, Excel 2000, Excel 2002, or Excel 2003)? This site is for you! If you use a later version of Excel, visit our ExcelTips site focusing on the ribbon interface.
FREE SERVICE: Get tips like this every week in ExcelTips, a free productivity newsletter. Enter your address and click "Subscribe."
Copyright © 2026 Sharon Parq Associates, Inc.
Comments