Please Note: This article is written for users of the following Microsoft Excel versions: 97, 2000, 2002, and 2003. If you are using a later version (Excel 2007 or later), this tip may not work for you. For a version of this tip written specifically for later versions of Excel, click here: Working with Elapsed Time.
Written by Allen Wyatt (last updated July 27, 2019)
This tip applies to Excel 97, 2000, 2002, and 2003
Excel allows you to enter many things into a cell, including times. This leads some people to use Excel to help calculate elapsed times. For instance, you may have a column that contains a starting time, another that contains an ending time, and then use a third column to calculate the time between the beginning and ending time.
In such situations, you may be tempted to simply put the following as your formula in the cells of the third column:
=B2-A2
This will work fine, provided the time shown in B2 is always later than the time shown in A2. However, you will get erroneous results if the times do not fit this rigid stricture. What do you do if you are running operations around the clock, and it is just as likely that the value at A2 will be just before midnight and the value in B2 will be after midnight?
One solution is to make sure that you always enter dates with your times. If you do this, then B2 will always be later than A2. For many people, however, this is a bother. If you find yourself simply entering the time, then you are still up the creek.
If you enter your times without an AM/PM designation using a 12-hour clock, then you should use the following formula in the cells of the third column:
=IF(A2>B2,(B2+0.5)-A2,B2-A2)
This formula uses the IF function to determine if the beginning time is later than the ending time. If it is, then .5 (which is half a day, or 12 hours) is added to the ending time before the subtraction is done. If the beginning time is earlier then the ending time, then a normal subtraction operation is done.
If you use an AM/PM designation in your times, or you enter information using a 24-hour clock, then the formula must change just a bit. Now it should appear as follows:
=IF(A2>B2,(B2+1)-A2,B2-A2)
Now, instead of adding only half a day, you are adding a whole day (24 hours) to the ending time. This, again, provides the proper result.
It is interesting to note that in both of these instances, Excel allows you to add hours and minutes, if desired. While the above example is clean and simple, the following could also have been used:
=IF(A19>B19,(B19+"24:00")-A19,B19-A19)
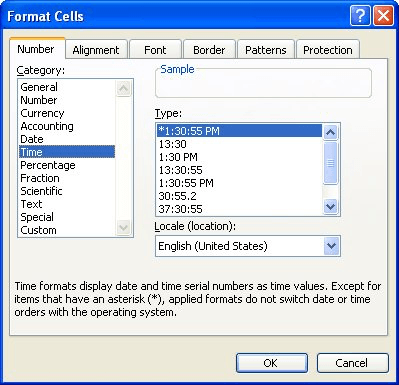
Regardless of the formula you use, once it is entered you need to make sure the cell with the formula is formatted to properly show elapsed time. You do this by following these steps:

Figure 1. The Format Cells dialog box.
Your cell now shows the correct elapsed hours, minutes, and seconds.
ExcelTips is your source for cost-effective Microsoft Excel training. This tip (2819) applies to Microsoft Excel 97, 2000, 2002, and 2003. You can find a version of this tip for the ribbon interface of Excel (Excel 2007 and later) here: Working with Elapsed Time.

Best-Selling VBA Tutorial for Beginners Take your Excel knowledge to the next level. With a little background in VBA programming, you can go well beyond basic spreadsheets and functions. Use macros to reduce errors, save time, and integrate with other Microsoft applications. Fully updated for the latest version of Office 365. Check out Microsoft 365 Excel VBA Programming For Dummies today!
Excel allows you to store times in a worksheet. If you want to use Excel to time certain events, there are a couple of ...
Discover MoreIf you need to determine the date of the last day in a month, it's hard to beat the flexibility of the EOMONTH function. ...
Discover MoreThere are calendar days and then there are business days. Excel provides the NETWORKDAYS function that is helpful to ...
Discover MoreFREE SERVICE: Get tips like this every week in ExcelTips, a free productivity newsletter. Enter your address and click "Subscribe."
There are currently no comments for this tip. (Be the first to leave your comment—just use the simple form above!)
Got a version of Excel that uses the menu interface (Excel 97, Excel 2000, Excel 2002, or Excel 2003)? This site is for you! If you use a later version of Excel, visit our ExcelTips site focusing on the ribbon interface.
FREE SERVICE: Get tips like this every week in ExcelTips, a free productivity newsletter. Enter your address and click "Subscribe."
Copyright © 2025 Sharon Parq Associates, Inc.
Comments