Please Note: This article is written for users of the following Microsoft Excel versions: 97, 2000, 2002, and 2003. If you are using a later version (Excel 2007 or later), this tip may not work for you. For a version of this tip written specifically for later versions of Excel, click here: Pulling Formulas from a Worksheet.
Excel allows you to display the formulas in a worksheet simply by making sure the Formulas check box is selected on the View tab of the Options dialog box. This can be a handy way to print a worksheet that shows the formulas used to create the worksheet.
However, this approach only works well if the formulas used in the worksheet are rather short. If the formulas are longer, then understanding a worksheet with formulas displayed can quickly become a bothersome chore.
One solution is to pull the formulas from Excel and place them in a program such as Word. Why Word? Because you can easily format text attributes (such as typeface and point size) to best display your formulas. You can also add additional text to explain the formulas, if desired.
The simplest way to get formulas from Excel into Word is to follow these steps:
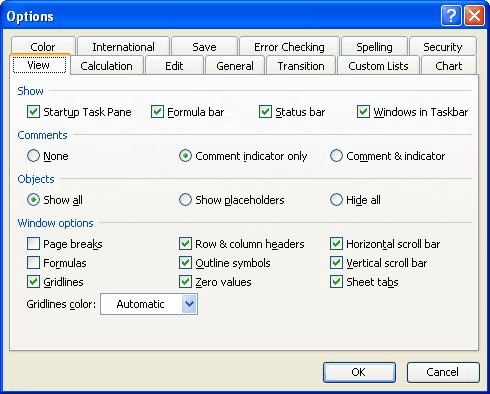
Figure 1. The View tab of the Options dialog box.

Figure 2. The Paste Special dialog box in Word.
At this point your formulas are in Word, and you can do with them as you see fit. While this approach works well, it can become bothersome to do this over and over again if you have a large number of formulas to copy. If you are in such a situation, you would benefit from having a macro that actually pulled the formulas and placed them in a Word document for you. The following Excel macro will do just that:
Sub WriteFormulasToWord()
    Dim Wrd As New Word.Application
    Dim CellTxt As String
    Dim CellAddr As String
    Dim SRow As Long
    Dim SCol As Long

    Wrd.Visible = True
    Wrd.Documents.Add

    Wrd.Selection.TypeText Text:="List of the Formulas of Sheet """ _
      & ActiveSheet.Name & """ in Workbook """ _
      & ActiveWorkbook.Name & """."
    Wrd.Selection.TypeText Text:=vbCrLf & vbCrLf

    'Change the following line to pick the number of columns
    For SCol = 1 To 5
        'Change the following line to pick the number of rows
        For SRow = 1 To 10
            If Cells(SRow, SCol).HasFormula Then
                CellAddr = Chr(64 + SCol) & Trim(Str(SRow)) & vbTab
                CellTxt = ActiveSheet.Cells(SRow, SCol).Formula
                Wrd.Selection.TypeText Text:=CellAddr & CellTxt
                Wrd.Selection.TypeText Text:=vbCrLf
            End If
        Next SRow
        Wrd.Selection.TypeText Text:=vbCrLf
    Next SCol
End Sub
There are a couple of things to note in this macro. First of all, you can change the range of rows and columns over which the macro works by changing the noted For statements that use both SCol and SRow. In the example shown above, the macro pulls formulas from columns 1 through 5 (A through E) and rows 1 through 10.
In addition, this macro will not work properly unless you set up Excel macros to handle references to Word objects. You do that by following these steps within the VBA Editor:
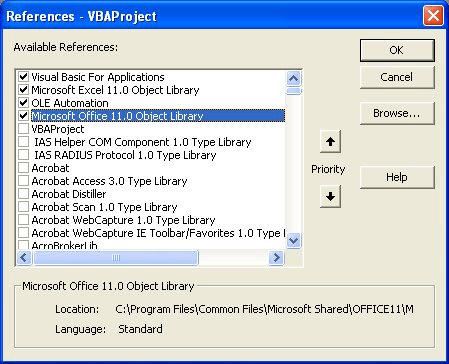
Figure 3. The References dialog box.
An advantage to using a macro to actually pull your formulas is that you can customize exactly what is placed in the Word document. In the case of this macro, the address of the cell is inserted, followed by a tab character, and then the actual formula. You could just as easily change the information inserted to be anything you need in your particular instance.
Note:
ExcelTips is your source for cost-effective Microsoft Excel training. This tip (3190) applies to Microsoft Excel 97, 2000, 2002, and 2003. You can find a version of this tip for the ribbon interface of Excel (Excel 2007 and later) here: Pulling Formulas from a Worksheet.

Professional Development Guidance! Four world-class developers offer start-to-finish guidance for building powerful, robust, and secure applications with Excel. The authors show how to consistently make the right design decisions and make the most of Excel's powerful features. Check out Professional Excel Development today!
Need to know the directory (folder) in which a workbook was saved? You can create a formula that will return this ...
Discover MoreEnter a formula (starting with an equal sign) and you may be surprised if Excel doesn't calculate the formula. Here's a ...
Discover MoreNeed to pull just a limited amount of information from a large list? Here are a few approaches you might be able to use ...
Discover MoreFREE SERVICE: Get tips like this every week in ExcelTips, a free productivity newsletter. Enter your address and click "Subscribe."
There are currently no comments for this tip. (Be the first to leave your comment—just use the simple form above!)
Got a version of Excel that uses the menu interface (Excel 97, Excel 2000, Excel 2002, or Excel 2003)? This site is for you! If you use a later version of Excel, visit our ExcelTips site focusing on the ribbon interface.
FREE SERVICE: Get tips like this every week in ExcelTips, a free productivity newsletter. Enter your address and click "Subscribe."
Copyright © 2026 Sharon Parq Associates, Inc.
 Please Note:
This article is written for users of the following Microsoft Excel versions: 97, 2000, 2002, and 2003. If you are using a later version (Excel 2007 or later), this tip may not work for you. For a version of this tip written specifically for later versions of Excel, click here:
Please Note:
This article is written for users of the following Microsoft Excel versions: 97, 2000, 2002, and 2003. If you are using a later version (Excel 2007 or later), this tip may not work for you. For a version of this tip written specifically for later versions of Excel, click here:
Comments