Please Note: This article is written for users of the following Microsoft Excel versions: 97, 2000, 2002, and 2003. If you are using a later version (Excel 2007 or later), this tip may not work for you. For a version of this tip written specifically for later versions of Excel, click here: Creating Add-Ins.

Creating Add-Ins

Written by Allen Wyatt (last updated September 30, 2023)
This tip applies to Excel 97, 2000, 2002, and 2003


Any Excel workbook can be converted to an add-in. The steps you need to follow to create an add-in are very precise, and may seem a bit overwhelming (particularly the first couple of times you do it). To create a protected add-in file, follow these steps:
  1. Load the workbook that is destined to become your add-in.
  2. Start the Visual Basic Editor by choosing Macro from the Tools menu, then choosing Visual Basic Editor.
  3. At the very top of the Project window, select the bold entry that declares the name of the VBA project that is open.
  4. Choose the Properties option from the Tools menu. This displays the Project Properties dialog box.
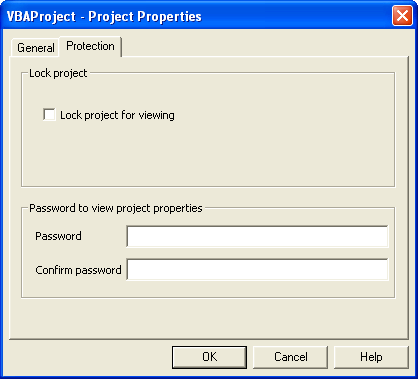
  5. Make sure the Protection tab is selected. (See Figure 1.)
  6. Figure 1. The Protection tab of the project's Properties dialog box.
  7. Make sure the Lock Project For Viewing check box is selected.
  8. Enter a password in both fields at the bottom of the dialog box.
  9. Click on OK. The dialog box closes.
  10. Close the Visual Basic Editor and return to the Excel workbook.
  11. Choose Properties from the File menu. This displays the Properties dialog box for your workbook.
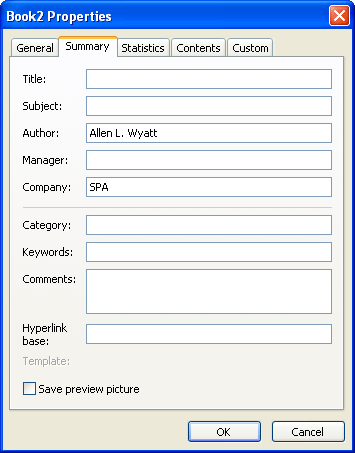
  12. Make sure the Summary tab is displayed. (See Figure 2.)
  13. Figure 2. The Summary tab of the workbook's Properties dialog box.

  14. Make sure the Title field is filled in. What you enter here will appear in the Add-Ins dialog box used by Excel.
  15. Make sure the Comments field is filled in. What you enter here will appear in the description area of the Add-Ins dialog box used by Excel.
  16. Click on the OK button to close the dialog box.
  17. Choose Save As from the File menu. This displays the Save As dialog box.
  18. Using the Save As Type pull-down list, specify a file type of Microsoft Excel Add-In (*.xla).
  19. Specify a name for your add-in file in the File Name field.
  20. Click on Save. Your add-in file is created.
  21. Close the workbook you just saved as an add-in.

Note:

If you would like to know how to use the macros described on this page (or on any other page on the ExcelTips sites), I've prepared a special page that includes helpful information. Click here to open that special page in a new browser tab.

ExcelTips is your source for cost-effective Microsoft Excel training. This tip (2927) applies to Microsoft Excel 97, 2000, 2002, and 2003. You can find a version of this tip for the ribbon interface of Excel (Excel 2007 and later) here: Creating Add-Ins.

Author Bio

Allen Wyatt

With more than 50 non-fiction books and numerous magazine articles to his credit, Allen Wyatt is an internationally recognized author. He is president of Sharon Parq Associates, a computer and publishing services company. ...

MORE FROM ALLEN

Removing Extra Paragraph Marks

Tired of having too many paragraph breaks in your document? You can get rid of the extra paragraph marks by using the ...

Discover More

Counting String Occurrences in Odd Rows

Counting the number of times text occurs within a range of cells can be relatively easy. If you need to only count ...

Discover More

Making VLOOKUP Trigger a Macro

VLOOKUP is an oft-used worksheet function to lookup values in a data table. If the function cannot return a value, it ...

Discover More

Create Custom Apps with VBA! Discover how to extend the capabilities of Office 2013 (Word, Excel, PowerPoint, Outlook, and Access) with VBA programming, using it for writing macros, automating Office applications, and creating custom applications. Check out Mastering VBA for Office 2013 today!

More ExcelTips (menu)

Quickly Dumping Array Contents

Variable arrays are used quite often in macros. If you use an array once in your macro and then need to reuse it for ...

Discover More

Unhiding or Listing All Objects

An Excel workbook can contain quite a few different objects. Sometimes those objects can be hidden so that they are not ...

Discover More

Displaying a Set Column Range

Do you want to display a particular range of columns within the Excel window? Here's a couple ways you can accomplish the ...

Discover More
Subscribe

FREE SERVICE: Get tips like this every week in ExcelTips, a free productivity newsletter. Enter your address and click "Subscribe."

View most recent newsletter.

Comments

If you would like to add an image to your comment (not an avatar, but an image to help in making the point of your comment), include the characters [{fig}] (all 7 characters, in the sequence shown) in your comment text. You’ll be prompted to upload your image when you submit the comment. Maximum image size is 6Mpixels. Images larger than 600px wide or 1000px tall will be reduced. Up to three images may be included in a comment. All images are subject to review. Commenting privileges may be curtailed if inappropriate images are posted.

What is 2 + 2?

There are currently no comments for this tip. (Be the first to leave your comment—just use the simple form above!)


This Site

Got a version of Excel that uses the menu interface (Excel 97, Excel 2000, Excel 2002, or Excel 2003)? This site is for you! If you use a later version of Excel, visit our ExcelTips site focusing on the ribbon interface.

Newest Tips
Subscribe

FREE SERVICE: Get tips like this every week in ExcelTips, a free productivity newsletter. Enter your address and click "Subscribe."

(Your e-mail address is not shared with anyone, ever.)

View the most recent newsletter.