Please Note: This article is written for users of the following Microsoft Excel versions: 97, 2000, 2002, and 2003. If you are using a later version (Excel 2007 or later), this tip may not work for you. For a version of this tip written specifically for later versions of Excel, click here: Using Revision Tracking.
If you are a Microsoft Word user, you may already be familiar with what is meant by the term revision tracking. If not, then you are in for a treat. In a nutshell, Excel allows you to keep track of the changes made to your workbook. Thus, you can see what has been added, deleted, or simply changed.
Revision tracking is normally meant for use in a shared environment, so you can track how other people may have changed a workbook for which you are responsible. However, it can also be a valuable tool even if you are the only one using a workbook. It can be used so you can see your own changes over time.
Revision marking is turned on or off on a per-workbook basis. Thus, if you have two workbooks open at the same time, revision marking can be turned on in either, both, or none of the workbooks. You control revision marking by choosing Track Changes from the Tools menu. This displays a submenu from which you should choose Highlight Changes. Excel displays the Highlight Changes dialog box. (See Figure 1.)
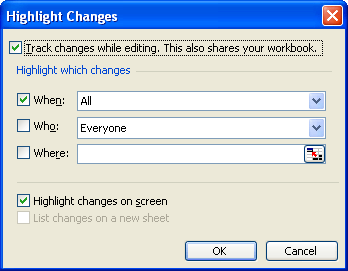
Figure 1. The Highlight Changes dialog box.
To turn on revision marking, simply select the check box at the top of the dialog box. If you later want to turn off revision marking, you can display this dialog box again and clear the check box.
With revision marking turned on, you can specify how you want this tool to be used by Excel. The three check boxes in the middle of the dialog box allow you to specify which changes should be highlighted, and the check boxes at the bottom of the dialog box indicate how the highlights appear. The center check boxes (When, Who, and Where) have more to do with resolving revisions, as discussed in a later tip.
At the least, you will want to make sure that the Highlight Changes On Screen check box is selected. This causes your workbook edits to be visible.
ExcelTips is your source for cost-effective Microsoft Excel training. This tip (2868) applies to Microsoft Excel 97, 2000, 2002, and 2003. You can find a version of this tip for the ribbon interface of Excel (Excel 2007 and later) here: Using Revision Tracking.

Excel Smarts for Beginners! Featuring the friendly and trusted For Dummies style, this popular guide shows beginners how to get up and running with Excel while also helping more experienced users get comfortable with the newest features. Check out Excel 2019 For Dummies today!
Lots of people prefer to enter information directly into Excel, but there is another way that may be helpful: Using data ...
Discover MoreOutlining, a feature built into Excel, can be a great way to help organize large amounts of data. This tip provides an ...
Discover MoreExcel provides a great tool that is helpful in figuring out what certain variables should be in your formulas. This tip ...
Discover MoreFREE SERVICE: Get tips like this every week in ExcelTips, a free productivity newsletter. Enter your address and click "Subscribe."
There are currently no comments for this tip. (Be the first to leave your comment—just use the simple form above!)
Got a version of Excel that uses the menu interface (Excel 97, Excel 2000, Excel 2002, or Excel 2003)? This site is for you! If you use a later version of Excel, visit our ExcelTips site focusing on the ribbon interface.
FREE SERVICE: Get tips like this every week in ExcelTips, a free productivity newsletter. Enter your address and click "Subscribe."
Copyright © 2026 Sharon Parq Associates, Inc.
 Please Note:
This article is written for users of the following Microsoft Excel versions: 97, 2000, 2002, and 2003. If you are using a later version (Excel 2007 or later), this tip may not work for you. For a version of this tip written specifically for later versions of Excel, click here:
Please Note:
This article is written for users of the following Microsoft Excel versions: 97, 2000, 2002, and 2003. If you are using a later version (Excel 2007 or later), this tip may not work for you. For a version of this tip written specifically for later versions of Excel, click here:
Comments