Please Note: This article is written for users of the following Microsoft Excel versions: 97, 2000, 2002, and 2003. If you are using a later version (Excel 2007 or later), this tip may not work for you. For a version of this tip written specifically for later versions of Excel, click here: Moving and Copying Cells.
Written by Allen Wyatt (last updated January 4, 2020)
This tip applies to Excel 97, 2000, 2002, and 2003
Moving and copying cells is a very common procedure when you are developing or editing your worksheets. Excel refers to moving by a different term, however. It is called cutting, which implies that you cut the information from one place and put it in another. Copying differs from cutting in that copying does not disturb the original cells; cutting clears them.
Whether you are cutting or copying, these operations involve the use of the Clipboard, a temporary storage area that is built into Windows. To cut or copy information, you must first select the cells you want to affect. Then do one of the following:
Once you have done one of these, you can use the Paste or Paste Special commands to place your information elsewhere. Pasting functions the same as in other Windows programs; it places the contents of the Clipboard at the current cursor location. In the case of Excel, the information is placed in your worksheet beginning with the currently selected cell. You can paste the Clipboard contents by choosing Paste from the Edit menu, pressing Ctrl+V, right-clicking a cell and choosing Paste from the Context menu, choosing Paste from the Edit menu, or clicking the Paste tool on the toolbar.
Within Excel there is another pasting option available. This option, called Paste Special, is rather unique. It allows you to specify how Excel should paste the information in the Clipboard. When you choose it, you will see the Paste Special dialog box. The settings in the dialog box control which portion of the information in the Clipboard you want pasted, as well as what operations you want taken on the information being pasted. (See Figure 1.)
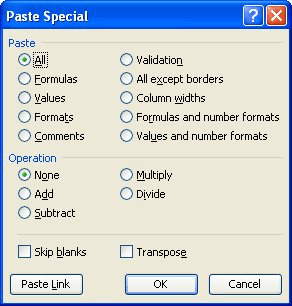
Figure 1. The Paste Special dialog box.
To display the dialog box choose Paste Special from the Edit menu.
ExcelTips is your source for cost-effective Microsoft Excel training. This tip (2115) applies to Microsoft Excel 97, 2000, 2002, and 2003. You can find a version of this tip for the ribbon interface of Excel (Excel 2007 and later) here: Moving and Copying Cells.

Solve Real Business Problems Master business modeling and analysis techniques with Excel and transform data into bottom-line results. This hands-on, scenario-focused guide shows you how to use the latest Excel tools to integrate data from multiple tables. Check out Microsoft Excel Data Analysis and Business Modeling today!
When editing a cell, you may want to cancel the edit at some point. There are two ways to do this, both described in this ...
Discover MoreAs you are entering data in a worksheet, Excel can monitor what you type and make corrections for common mistakes. One ...
Discover MoreDo you need to know how many words are in a range of cells? Excel provides no intrinsic way to count the words, but you ...
Discover MoreFREE SERVICE: Get tips like this every week in ExcelTips, a free productivity newsletter. Enter your address and click "Subscribe."
There are currently no comments for this tip. (Be the first to leave your comment—just use the simple form above!)
Got a version of Excel that uses the menu interface (Excel 97, Excel 2000, Excel 2002, or Excel 2003)? This site is for you! If you use a later version of Excel, visit our ExcelTips site focusing on the ribbon interface.
FREE SERVICE: Get tips like this every week in ExcelTips, a free productivity newsletter. Enter your address and click "Subscribe."
Copyright © 2026 Sharon Parq Associates, Inc.
 Please Note:
This article is written for users of the following Microsoft Excel versions: 97, 2000, 2002, and 2003. If you are using a later version (Excel 2007 or later), this tip may not work for you. For a version of this tip written specifically for later versions of Excel, click here:
Please Note:
This article is written for users of the following Microsoft Excel versions: 97, 2000, 2002, and 2003. If you are using a later version (Excel 2007 or later), this tip may not work for you. For a version of this tip written specifically for later versions of Excel, click here:
Comments