Please Note: This article is written for users of the following Microsoft Excel versions: 97, 2000, 2002, and 2003. If you are using a later version (Excel 2007 or later), this tip may not work for you. For a version of this tip written specifically for later versions of Excel, click here: Saving Common Formulas.
Written by Allen Wyatt (last updated December 5, 2020)
This tip applies to Excel 97, 2000, 2002, and 2003
Sometimes, creating just the formula you want can be a victory all in itself. Once created, formulas become valuable, and you may need to use them over and over again in different worksheets you use. Wouldn't it be great to have a way to paste commonly used formulas in a workbook, the same way you can paste clip art or other common objects?
Unfortunately, such a capability is not resident within Excel. There are a couple of things you can do to make your formulas more accessible, however. One thing you can do is keep a text document (a Notepad document) on your desktop, and store your commonly used formulas in it. With Excel open, you can open the text document, copy the desired formula to the Clipboard, and quickly paste it in the desired cell of the workbook.
Another possible solution is to assign names to your formulas.
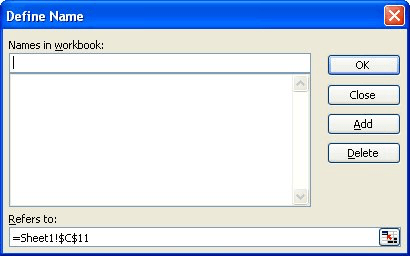
Figure 1. The Define Name dialog box.
Now, whenever you want to use the formula, you simply enter an equal sign and the name you gave to the formula in step 7. Even though the name shows in the cell, the formula assigned to the name is actually used in doing the calculation. Since the formula used relative references (you got rid of the dollar signs), it is always relative to where you use the name in the worksheet.
Another approach works great if you are comfortable with macros and with the VB Editor. This approach involves making your common formulas part of your Personal.xls file. This workbook is opened whenever you start Excel, and is designed primarily for macros and customizations that you want available whenever you use Excel. But, there is no reason it cannot be used for common formulas, as well.
Assuming you haven't yet created a Personal.xls file, follow these steps:
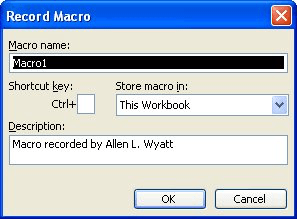
Figure 2. The Record Macro dialog box.
The macro you recorded is now stored in your newly created Personal.xls worksheet. To see the code that you created, open the VB Editor (Alt+F11). In the upper-left corner of the editor is the Project Explorer; it lists all the various pieces and parts accessible through the editor. One of the items in the Project Explorer should be PERSONAL.XLS. If you expand this object (click the small plus sign to the left of the project name), you should see a Modules folder. Expand the Modules folder, and it contains Module1. If you double-click on this module you see the macro you just recorded; it looks something like this:
Sub Macro1()

' Macro1 Macro
'

'
    Range("A4").Select
End Sub
You can now select this code and delete it, since you don't need it any more. You can then place other macros or user-defined function in the module, so they will be available.
What about formulas? Copy them to the Clipboard and paste them in the module, outside of any procedures defined therein. All you need to do is make sure you preface the formula with an apostrophe, so that the VB Editor thinks you are entering a comment. When you need the formulas at a later time, just go to the VB Editor, open the module, copy the formula, and paste it into the workbook you need.
Note:
ExcelTips is your source for cost-effective Microsoft Excel training. This tip (2957) applies to Microsoft Excel 97, 2000, 2002, and 2003. You can find a version of this tip for the ribbon interface of Excel (Excel 2007 and later) here: Saving Common Formulas.
Save Time and Supercharge Excel! Automate virtually any routine task and save yourself hours, days, maybe even weeks. Then, learn how to make Excel do things you thought were simply impossible! Mastering advanced Excel macros has never been easier. Check out Excel 2010 VBA and Macros today!
Need to count the number of cells in a range that are not blank? You can use the COUNTA function of a more complex ...
Discover MoreWhen you've got a column full of names, you may want to get a count of how many of those names are unique. You can make ...
Discover MoreExcel is usually more flexible in what you can reference in formulas than is immediately apparent. This tip examines some ...
Discover MoreFREE SERVICE: Get tips like this every week in ExcelTips, a free productivity newsletter. Enter your address and click "Subscribe."
There are currently no comments for this tip. (Be the first to leave your comment—just use the simple form above!)
Got a version of Excel that uses the menu interface (Excel 97, Excel 2000, Excel 2002, or Excel 2003)? This site is for you! If you use a later version of Excel, visit our ExcelTips site focusing on the ribbon interface.
FREE SERVICE: Get tips like this every week in ExcelTips, a free productivity newsletter. Enter your address and click "Subscribe."
Copyright © 2025 Sharon Parq Associates, Inc.
 Please Note:
This article is written for users of the following Microsoft Excel versions: 97, 2000, 2002, and 2003. If you are using a later version (Excel 2007 or later), this tip may not work for you. For a version of this tip written specifically for later versions of Excel, click here:
Please Note:
This article is written for users of the following Microsoft Excel versions: 97, 2000, 2002, and 2003. If you are using a later version (Excel 2007 or later), this tip may not work for you. For a version of this tip written specifically for later versions of Excel, click here:
Comments