Please Note: This article is written for users of the following Microsoft Excel versions: 97, 2000, 2002, and 2003. If you are using a later version (Excel 2007 or later), this tip may not work for you. For a version of this tip written specifically for later versions of Excel, click here: Searching a Workbook by Default.
When you display the Find tab of the Find and Replace dialog box (pressing Ctrl+F is the easiest way), Excel makes certain assumptions about what exactly you want to search. (See Figure 1.) What you want to search is dictated by the setting of the Within drop-down list. When you first display the Find and Replace dialog, Within is set to Sheet, by default. This setting is true regardless of whether you select one worksheet or multiple worksheets prior to displaying the dialog box.
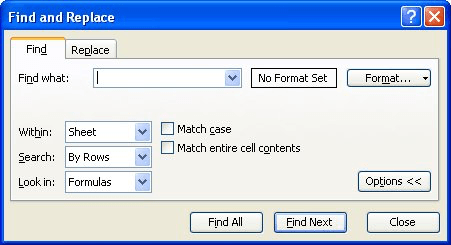
Figure 1. The Find tab of the Find and Replace dialog box.
If you want the Within drop-down list to default to Workbook (instead of Sheet), there is no way to specify this in Excel. You can take some solace in the fact that the setting of the Within drop-down list is persistent for the current session with Excel. In other words, if you set it to Workbook, complete your search, and later display the Find tab of the Find and Replace dialog, box then Within is still set to Workbook.
It is interesting that, at first blush, there appears to be no way tackle this issue using a macro. This is because Excel doesn't provide a way for a macro to easily display and modify the settings in the Find and Replace dialog box. Many dialog boxes can be displayed using the Dialogs collection, but not the Find and Replace. Instead, VBA allows you to display an older version of the Find dialog box, using this code:
Sub ShowFind1()
    Application.Dialogs(xlDialogFormulaFind).Show
End Sub
Unfortunately, this version of the Find dialog box does not have a control that allows you to specify the scope of the search, as can be done with the Within drop-down list in the Find tab of the Find and Replace dialog box.
There is a way to display the correct Find and Replace dialog box, but it isn't by using the Dialogs collection. Instead you need to pull up the dialog box using the CommandBars collection, which essentially displays the dialog box using a menu command. Here's how to do it:
Sub ShowFind2()
    ActiveSheet.Cells.Find What:="", LookAt:=xlWhole
    Application.CommandBars("Worksheet Menu Bar").FindControl( _
      ID:=1849, recursive:=True).Execute
End Sub
The Find method allows you to set the different parameters in the Find and Replace dialog, and then the CommandBars object is accessed to actually display the dialog box.
Note:
ExcelTips is your source for cost-effective Microsoft Excel training. This tip (3170) applies to Microsoft Excel 97, 2000, 2002, and 2003. You can find a version of this tip for the ribbon interface of Excel (Excel 2007 and later) here: Searching a Workbook by Default.

Professional Development Guidance! Four world-class developers offer start-to-finish guidance for building powerful, robust, and secure applications with Excel. The authors show how to consistently make the right design decisions and make the most of Excel's powerful features. Check out Professional Excel Development today!
Want to know what is happening in certain cells in your worksheet? Using the Watch Window is a great way to keep an eye ...
Discover MoreDepending on who you ask, Smart Tags can be really cool or really distracting. If you fall on the "cool" side, you may ...
Discover MoreLots of people prefer to enter information directly into Excel, but there is another way that may be helpful: Using data ...
Discover MoreFREE SERVICE: Get tips like this every week in ExcelTips, a free productivity newsletter. Enter your address and click "Subscribe."
There are currently no comments for this tip. (Be the first to leave your comment—just use the simple form above!)
Got a version of Excel that uses the menu interface (Excel 97, Excel 2000, Excel 2002, or Excel 2003)? This site is for you! If you use a later version of Excel, visit our ExcelTips site focusing on the ribbon interface.
FREE SERVICE: Get tips like this every week in ExcelTips, a free productivity newsletter. Enter your address and click "Subscribe."
Copyright © 2026 Sharon Parq Associates, Inc.
 Please Note:
This article is written for users of the following Microsoft Excel versions: 97, 2000, 2002, and 2003. If you are using a later version (Excel 2007 or later), this tip may not work for you. For a version of this tip written specifically for later versions of Excel, click here:
Please Note:
This article is written for users of the following Microsoft Excel versions: 97, 2000, 2002, and 2003. If you are using a later version (Excel 2007 or later), this tip may not work for you. For a version of this tip written specifically for later versions of Excel, click here:
Comments