Please Note: This article is written for users of the following Microsoft Excel versions: 97, 2000, 2002, and 2003. If you are using a later version (Excel 2007 or later), this tip may not work for you. For a version of this tip written specifically for later versions of Excel, click here: Checking Lock Status of Cells.
Written by Allen Wyatt (last updated November 23, 2020)
This tip applies to Excel 97, 2000, 2002, and 2003
Excel allows you to easily change whether a cell is formatted as locked or unlocked. This attribute is handled on a cell-by-cell basis, even though the effects of the locking (or unlocking) are not evident until such point as you protect the entire worksheet.
Since locking and unlocking can be done on an individual cell basis, you may wonder if there is a way to display the lock status (locked or unlocked) of all your cells in a worksheet, at one time, without the need to check each cell individually.
The default lock status for cells is locked, so it probably makes more sense to select those cells that are unlocked. One way you can do that is to follow these steps, if you are using Excel 2003:
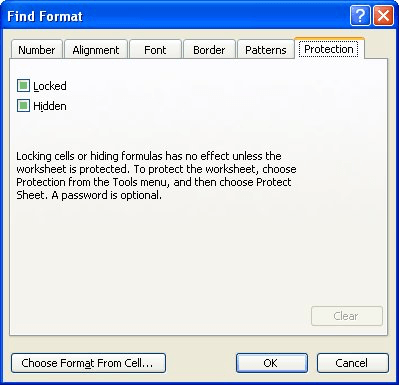
Figure 1. The Protection tab of the Find Format dialog box.
At this point, Excel will do one of two things. If it finds any unlocked cells, the addresses of those cells are listed on the screen. If it doesn't find any unlocked cells, then it informs you that it can't find them.
The above technique only works in Excel 2003 because the capability to search for formatting was only added in that version of Excel. Regardless of the version you are using, you can use conditional formatting to highlight unlocked cells. Follow these steps:
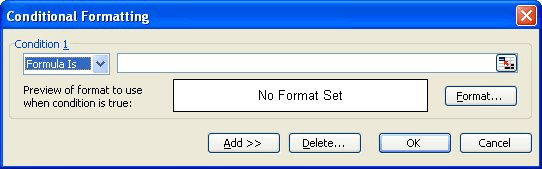
Figure 2. The Conditional Formatting dialog box.
=CELL("protect",A1)=0
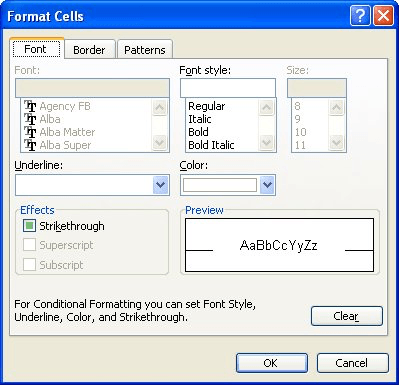
Figure 3. The Format Cells dialog box.
Now all the cells in your worksheet that are unlocked will have the formatting you defined in step 6.
ExcelTips is your source for cost-effective Microsoft Excel training. This tip (10765) applies to Microsoft Excel 97, 2000, 2002, and 2003. You can find a version of this tip for the ribbon interface of Excel (Excel 2007 and later) here: Checking Lock Status of Cells.

Create Custom Apps with VBA! Discover how to extend the capabilities of Office 2013 (Word, Excel, PowerPoint, Outlook, and Access) with VBA programming, using it for writing macros, automating Office applications, and creating custom applications. Check out Mastering VBA for Office 2013 today!
Need to make sure that your worksheet is locked, with only the blank cells accessible to editing? You can do this easily ...
Discover MoreWant to hide certain columns within a worksheet so the contents are not visible to others? The answer lies in formatting ...
Discover MoreExcel allows you to protect your worksheets easily—and that includes if you need to protect only a single worksheet ...
Discover MoreFREE SERVICE: Get tips like this every week in ExcelTips, a free productivity newsletter. Enter your address and click "Subscribe."
2016-05-24 13:42:17
Scott Renz
What is the meaning of being Locked or Unlocked? Is it just a word and there for our use and it means whatever we want it to mean? Or is it telling something about the characteristics of the cell?
2016-05-21 14:13:02
Rick Rothstein
Besides my earlier tip about selecting all the found cells, here is a code template for those wanting to physically change the format of already formatted cells (in this case, cells that are Unlocked)...
Sub DemoFindReplaceFormats()
' Clear any existing Cell Formats
Application.FindFormat.Clear
Application.ReplaceFormat.Clear
' Set the FindFormat search criteria...
' multiple criteria can be set if desired
Application.FindFormat.Locked = False
' Set the ReplaceFormat criteria... multiple criteria
' can be set if needed (as shown in the next two lines)
Application.ReplaceFormat.Interior.Color = vbYellow
Application.ReplaceFormat.Font.Color = vbRed
' Perform the Replace operation
Cells.Replace "", "", SearchFormat:=True, ReplaceFormat:=True
' Be nice and clear the Cell Formats so they don't
' interfere with the next use of Find or Replace
Application.FindFormat.Clear
Application.ReplaceFormat.Clear
End Sub
2016-05-21 13:55:53
Rick Rothstein
One thing to add to your first procedure (using the Find dialog box)... after you click "Find All" in Step 7, press CTRL+A to select all the cells that were found, then click the "Close" button... all the selected cells will remain selected so you can do things with them (color their interior, bold there font, etc.).
2016-05-21 06:54:29
Charles Monroe
I have a convention on all my spreadsheets:
Black text for formulae;
Blue text for data entry;
Green text (to the left of the cell) for cell names;
Red text for warnings & notifications.
I then have two macro's launched by separate buttons on the tool bar:
One macro will "Unprotect" a cell and format it with blue text;
The other macro will "protect" a cell and format it with black text.
As I develop a spreadsheet I simply use the "Unprotect" macro to format any cells as necessary. The second button to run the "Protect" macro is only if I have to change my mind! The blue text shows up clearly as cells which can be changed. Therefore, even if I don't "Protect" the entire worksheet, I am unlikely to overwrite formulae.
Got a version of Excel that uses the menu interface (Excel 97, Excel 2000, Excel 2002, or Excel 2003)? This site is for you! If you use a later version of Excel, visit our ExcelTips site focusing on the ribbon interface.
FREE SERVICE: Get tips like this every week in ExcelTips, a free productivity newsletter. Enter your address and click "Subscribe."
Copyright © 2024 Sharon Parq Associates, Inc.
 Please Note:
This article is written for users of the following Microsoft Excel versions: 97, 2000, 2002, and 2003. If you are using a later version (Excel 2007 or later), this tip may not work for you. For a version of this tip written specifically for later versions of Excel, click here:
Please Note:
This article is written for users of the following Microsoft Excel versions: 97, 2000, 2002, and 2003. If you are using a later version (Excel 2007 or later), this tip may not work for you. For a version of this tip written specifically for later versions of Excel, click here:
Comments