Setting Horizontal Alignment
Written by Allen Wyatt (last updated March 23, 2024)
This tip applies to Excel 97, 2000, 2002, and 2003
Excel provides many different ways you can align information from left to right (horizontally) within a cell. You set the alignment by first selecting the cells you want to format and then choosing Cells from the Format menu. Make sure the Alignment tab is selected. (See Figure 1.) You make your selection using the Horizontal drop-down list.
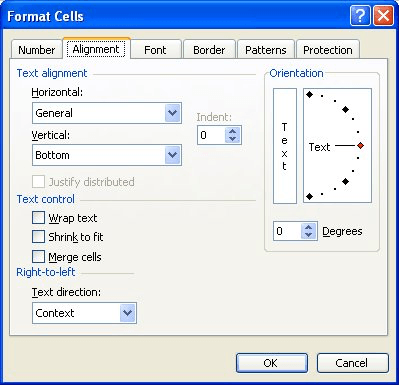
Figure 1. The Alignment tab of the Format Cells dialog box.
There are eight different settings you can use for horizontal alignment, each of which deserves explanation. (The most common of these horizontal alignment methods are also available from the Formatting toolbar.)
- General. When you first enter information in Excel, the horizontal alignment is set to General. This means that text aligns to the left of the cell and numbers align to the right. Typically, since Excel uses General as a default, you will not need to choose it explicitly except to remove any horizontal alignment formatting you previously applied.
- Left. Left alignment means that everything in the cell aligns to the left side of the cell. Unless you have a need to align your numbers or dates to the left, there is no real need to use this alignment option. That is because the default alignment (General) aligns all text to the left side of the cell. When text is left justified, text that will not fit within the width of the column will overrun the right cell border. This will not happen if there is anything in the cell to the right of the cell containing the wide text. You can also left-justify information by using the Align Left tool on the toolbar. In Excel 2000 and later versions you can also set an indent, in characters, if you use Left alignment.
- Center. Center alignment aligns all information in the middle of the cell. If text is centered and it needs more space than is available in the cell, it will overrun the left and right cell boundaries in order to be displayed. If there is anything in the cells on either side of the centered cell, the text will not extend into the occupied cell. You can also center information by using the Center tool on the toolbar.
- Right. It is most useful to right-align information if you are formatting cells containing text. That is because the default horizontal alignment (General) right-aligns numbers and dates. If text is right-aligned in a cell and it is wider than the column width, it will extend past the column boundary into the cell to the left. Excel will not extend the text, however, if there is anything in the cell to the left of the one containing the text. You can also right-align information by using the Align Right tool on the toolbar. In Excel 2002 and Excel 2003 you can also set an indent, in characters, if you use Right alignment.
- Fill. By all rights, this should not be an alignment option. That's because it really doesn't align information. Instead, it repeats whatever you enter across entire width of the column. Thus, if you want a column full of asterisks, all you need to do is use this alignment option an put one asterisk in the column.
- Justify. This alignment option is used primarily for text. It forces the information to fill the entire width of the column, wrapping text to additional lines, if necessary. This is the same sort of alignment feature available in many word processing programs.
- Center Across Selection. When you are creating forms or reports in Excel, it is not unusual to have headings. If you use the Center Across Selection alignment option, you can center text across a group of columns. To use this type of alignment in the easiest manner, make sure the information to be centered is in the first column of the selection. Then select the columns you want to center it across. Finally, select the Center Across Selection option in the Horizontal drop-down list.
- Distributed. This alignment option is available only in Excel 2002. It results in the cell contents being distributed across the width of the cell, to line up with both the left and right side. If you select this option, you can either set an indent, in characters (which applies to both the left and right sides of the cell), or you can choose to justify the contents in the cell. You should play with this option carefully; it is not nearly as helpful as the Justify alignment used in word processors such as Word. In Excel 2003 you can also set an indent, in characters, if you use Distributed alignment.
ExcelTips is your source for cost-effective Microsoft Excel training.
This tip (2123) applies to Microsoft Excel 97, 2000, 2002, and 2003.
Author Bio
Allen Wyatt
With more than 50 non-fiction books and numerous magazine articles to his credit, Allen Wyatt is an internationally recognized author. He is president of Sharon Parq Associates, a computer and publishing services company. Learn more about Allen...
Two-Line Headings in a TOC
If you use the TC field to mark what goes in a TOC, you may wonder why if you mark two lines together with the field they ...
Discover More
Finding Text in Text Boxes
Want to search for text that may appear in a text box rather than in a regular worksheet cell? You can only perform the ...
Discover More
Moving Master and Subdocuments
If you need to move master documents or subdocuments from one place to another on your computer, you have to keep in mind ...
Discover More
Changing Cell Colors
If you need to change the color with which a particular cell is filled, the easier method is to use the Fill Color tool, ...
Discover More
Changing Font Sizes
Want to change the size of the font within a worksheet? Excel allows you to choose from a list of sizes, as well as ...
Discover More
Formatting for Hundredths of Seconds
When you display a time in a cell, Excel normally displays just the hours, minutes, and seconds. If you want to display ...
Discover More
Comments